After registering an account and learning the basics of Ragic, many new users may be uncertain about how to start building their database. Before proceeding, it's recommended to consider the company's needs, determine which sheets to create, and understand the access rights required for different users. This will help you design a database structure that meets the requirements and avoid unnecessary mistakes.
Although Ragic offers high flexibility, allowing you to adjust the database structure at any time, accidental modifications to incorrect fields or links can result in data loss or errors. To avoid this, it’s strongly recommended to analyze the sheet structure before creating sheets and importing data. This will reduce rework and ensure data accuracy and consistency.
You can quickly create a database prototype that meets your needs and manage data effectively through three simple steps, minimizing future modification issues.
If your company is using a familiar, smoothly running database, you might consider using API integration to address its limitations and current issues, rather than building a new one. After all, implementing a new system and conducting employee training would be a large task.
If your needs are limited and you prefer starting from scratch, simply follow these three steps to quickly set up the basic database framework and use Ragic to manage your data efficiently.
In general, a database consists of several sheets. The first task is to determine which sheets your company needs and the content they should contain—essentially, the data or workflows the company wants to manage.
For example, if an organization wants to apply the database to member management, it might need a "Member Information" sheet and a "Member Purchase History" sheet. The "Member Information" sheet may include fields like name, phone number, address, and registration time. For "Inventory Management", you might need sheets like "Product List", "Incoming Orders", and "Outgoing Orders", with the "Product List" sheet including fields like product name, product ID, specifications, and unit price.
If you're still unsure about which sheets to create, it's recommended to refer to your existing workflow management processes and identify the sheets and fields needed for the database.
Referring to existing sheets is often the quickest method. By reviewing the sheets or files used daily, users can identify the information required for management processes and pinpoint any deficiencies or areas for improvement in the current sheets.
If no existing sheets are available to refer to, it is recommended to simulate the company's operations from scratch. For example, consider what information is needed when receiving an order and what records must be kept during the process.
If you're still unsure how to proceed, Ragic offers some built-in sheets for reference:
1. Install Templates: You can find many pre-built templates created by Ragic. For users who are still unclear about their internal needs, these templates can be downloaded and used alongside our documentation for guidance.
2. Quick Templates: When creating a new sheet, you'll find the "Quick Templates" menu on the right side. You can select the required category to try out and then add the necessary fields based on your company’s needs.
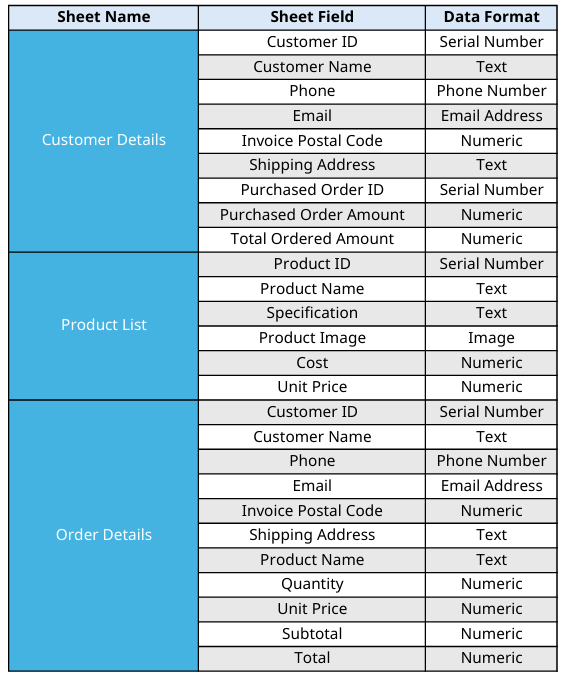
After determining the sheet names and fields, the next step is to select the appropriate data format for each field. This is crucial as it determines how data is stored in the database. Common formats include "numbers", "text", "dates", and "links". Selecting the correct format helps prevent issues, such as data corruption caused by changing field types. For example, converting a text field to a number type may result in incorrect display or data loss.
Although data can be restored through backups, imports, and exports, preventing issues from occurring in the first place is the most effective solution.
By following the above method, you can organize the required sheets and formats: "Sheet Name", "Sheet Field", and "Data Format"(see the image below):

After organizing the required sheets and fields in Step 1, the next critical step is linking the sheets. When managing data across multiple sheets, linking them is essential for data exchange and integration. In simple terms, you need to use the sheet linking function when processing data across sheets.
For example, suppose you have three different sheets: "Customer Details", "Product List", and "Order Details". Here are some common needs that require linking between sheets:
1. Select a customer from the "Customer Details" sheet when entering an order.
2. Select a product from the "Product List" sheet when entering an order.
3. View which products this customer has purchased.
4. View the total amount of orders this customer has placed.
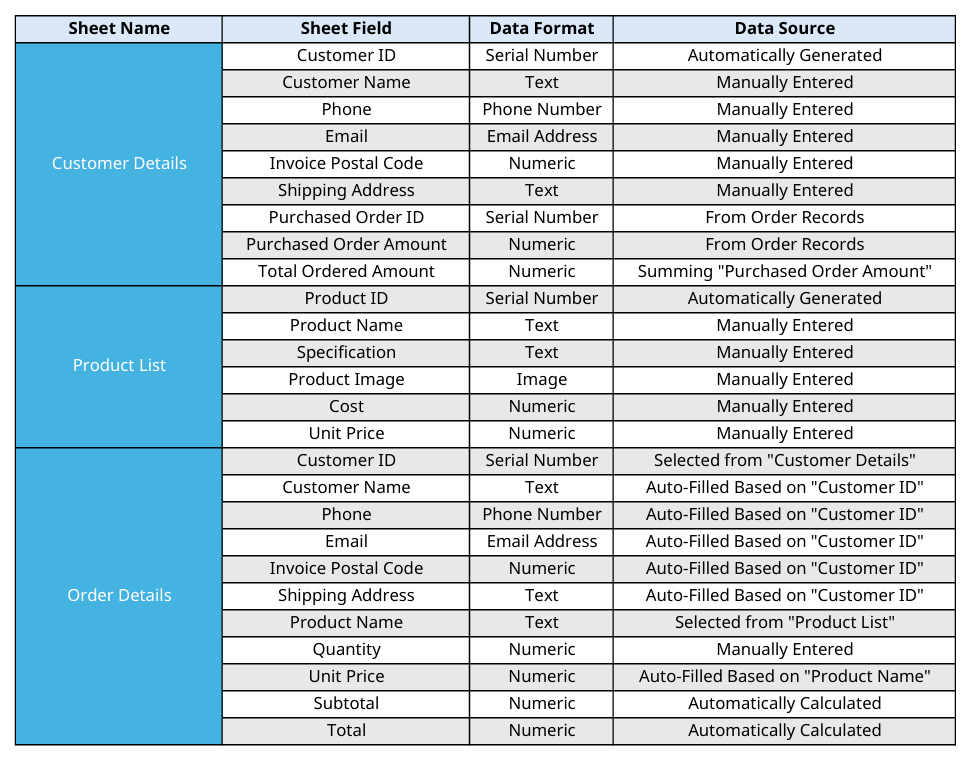
From the example above, it's clear that if the data needed for a particular functionality is spread across different sheets (e.g., customer and order, product and order, or other combinations), you'll need to link those sheets. In this step, you must decide whether each field from Step 1 will be manually entered, auto-filled based on other sheets, or automatically calculated using formulas.
Organize the data sources for each field (see the image below):

After completing the first two steps, you’ve built the database prototype. Now, move on to the final step: setting user access rights for the sheets. You need to decide which users can access these sheets and what specific permissions they have for each one.
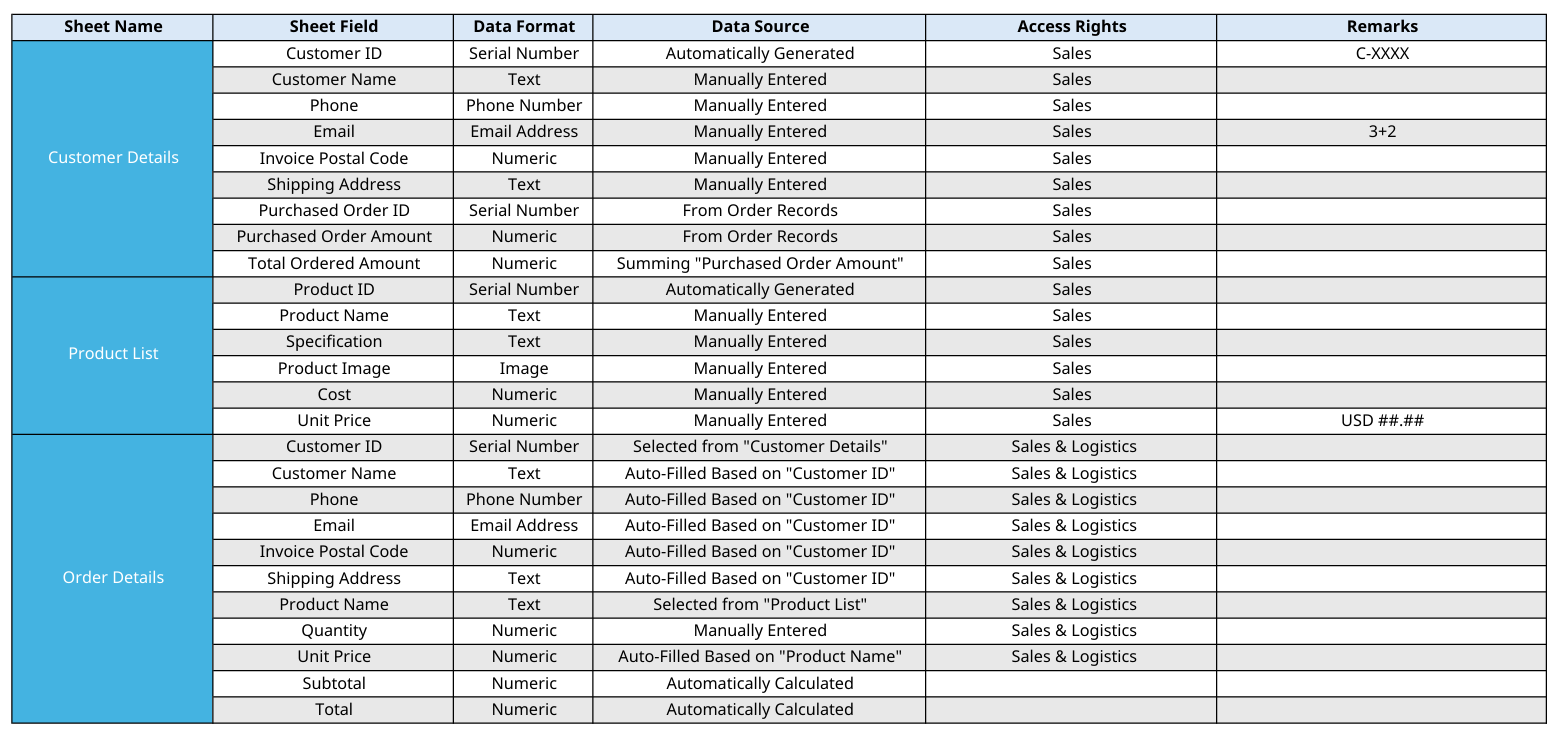
For example, you might want the sales department to view the "Customer Details", "Product List", and "Order Details" sheets, while the logistics department only needs access to the "Order Details" sheet, and the finance department focuses on the "Invoice Details" sheet. This access control ensures each department can only access records relevant to its responsibilities, enhancing data security and management efficiency.
Additionally, it's recommended to add field Remarks to specify the format settings for each field, to prevent forgetting them and requiring repeated changes.
Organize the Access Rights and remarks for each field (as shown in the image below):

After completing the three steps above, you have successfully built the prototype of your database structure. You can now begin actual operations.
Before you start, it's recommended to review our tutorial video or related manuals.
If you encounter any difficulties during the process, feel free to contact our customer service team at any time.
 Thank you for your valuable feedback!