Many companies operate on a "monthly statement" basis for transactions. Instead of settling payments for each individual shipment, invoices are usually accumulated throughout the month and settled at the end of the period. This system is particularly useful when involving frequent orders, as it reduces the administrative procedures of processing payments multiple times, which saves time for both parties.
Other than existing documents such as "Purchase Orders", "Delivery Notes", and "Sales Invoices", a "Monthly Reconciliation Statement" (or "Monthly Accounts Receivable/ Payable" Statement) is usually produced as well. Having a system that can automatically consolidate and calculate relevant data such as customer information, accounts receivable, accounts payable, and billing month from individual records into their corresponding monthly statement can create a more efficient workflow than manually compiling each customer's monthly statement. This way, you would only need to review the final reconciliation statement.
In this article, we use a typical "Delivery Note" (shipping receipt) as an example to demonstrate several methods of designing an automated "Monthly Reconciliation Statement" on Ragic, based on delivery (shipping) details.
Note: In situations where customers frequently place orders, you can:
(1) Create a separate "Order" or "Quotation" for each purchase and consolidate all the "Orders" and "Shipping Invoices" at the end of each month into a monthly statement, or
(2) Issue a single order per month and generate multiple "Shipping Invoices" from it, since shipments are made in multiple batches. You may also adopt other methods that suit your needs better. With Ragic, you can flexibly implement different workflows and designs based on your business requirements or situation, rather than adhering to a single, fixed process.
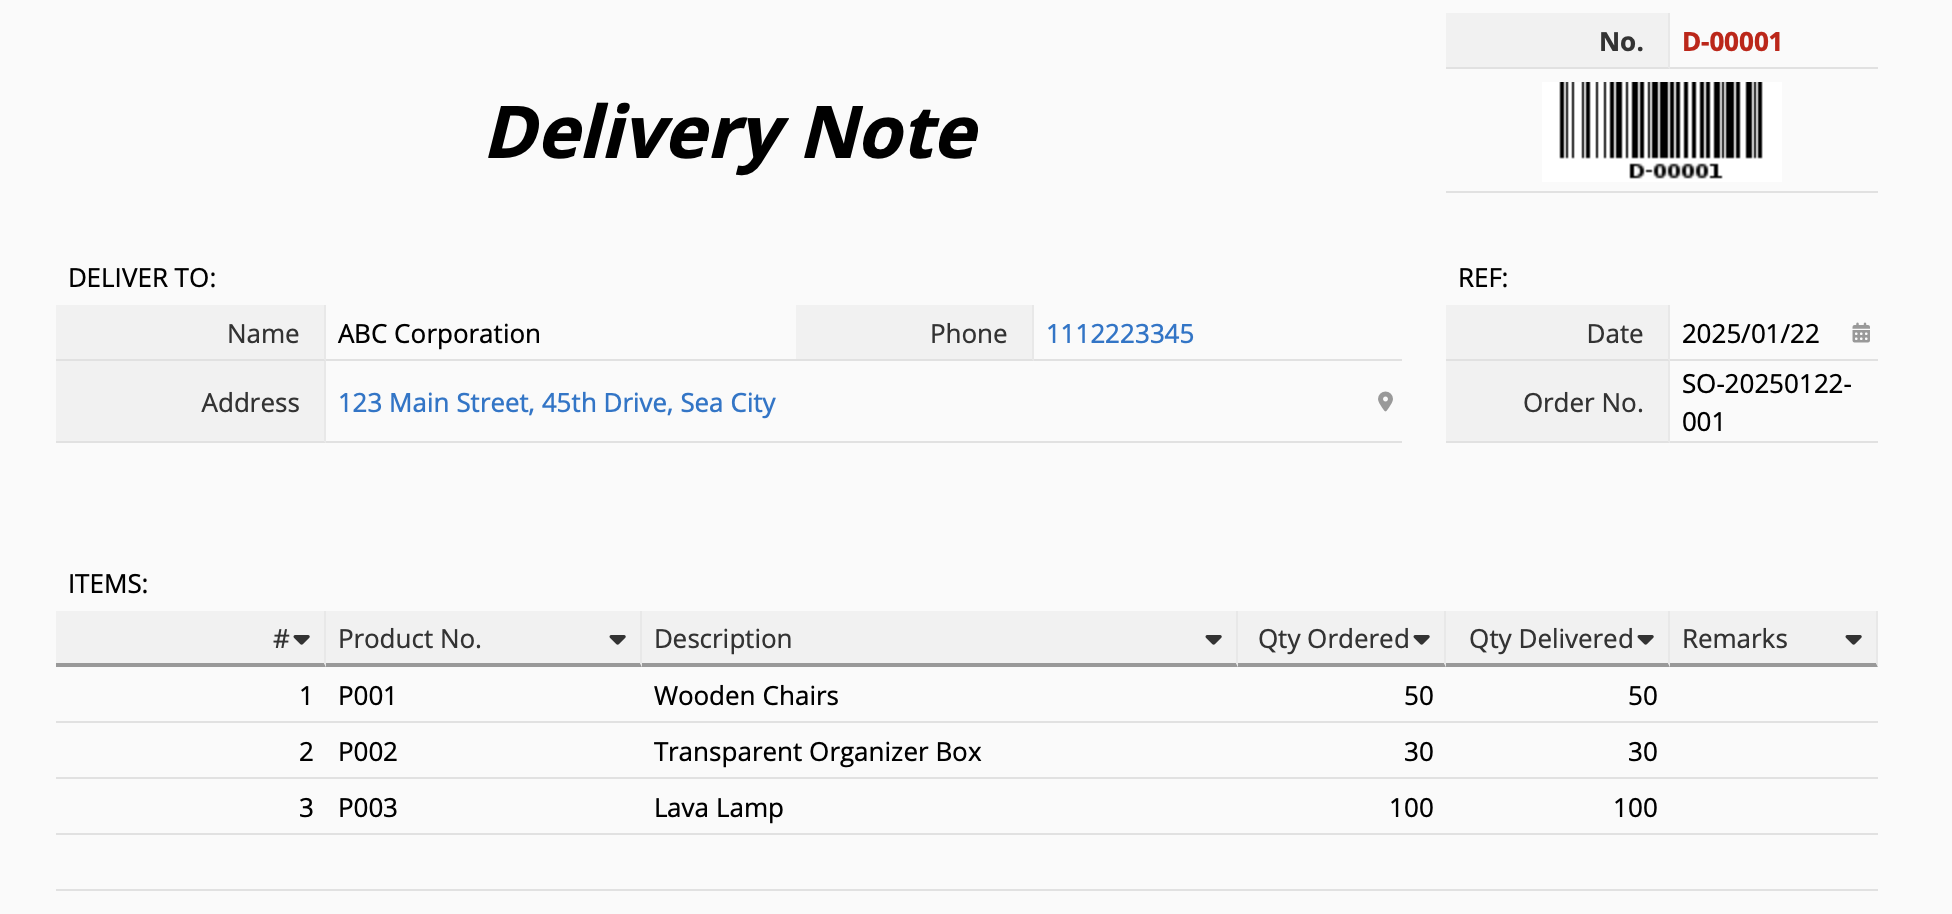
Basic shipping and sales information are placed in Ragic's independent fields, while sales and delivery details, which usually consists of multiple items, are placed in Subtables.
Or like this:
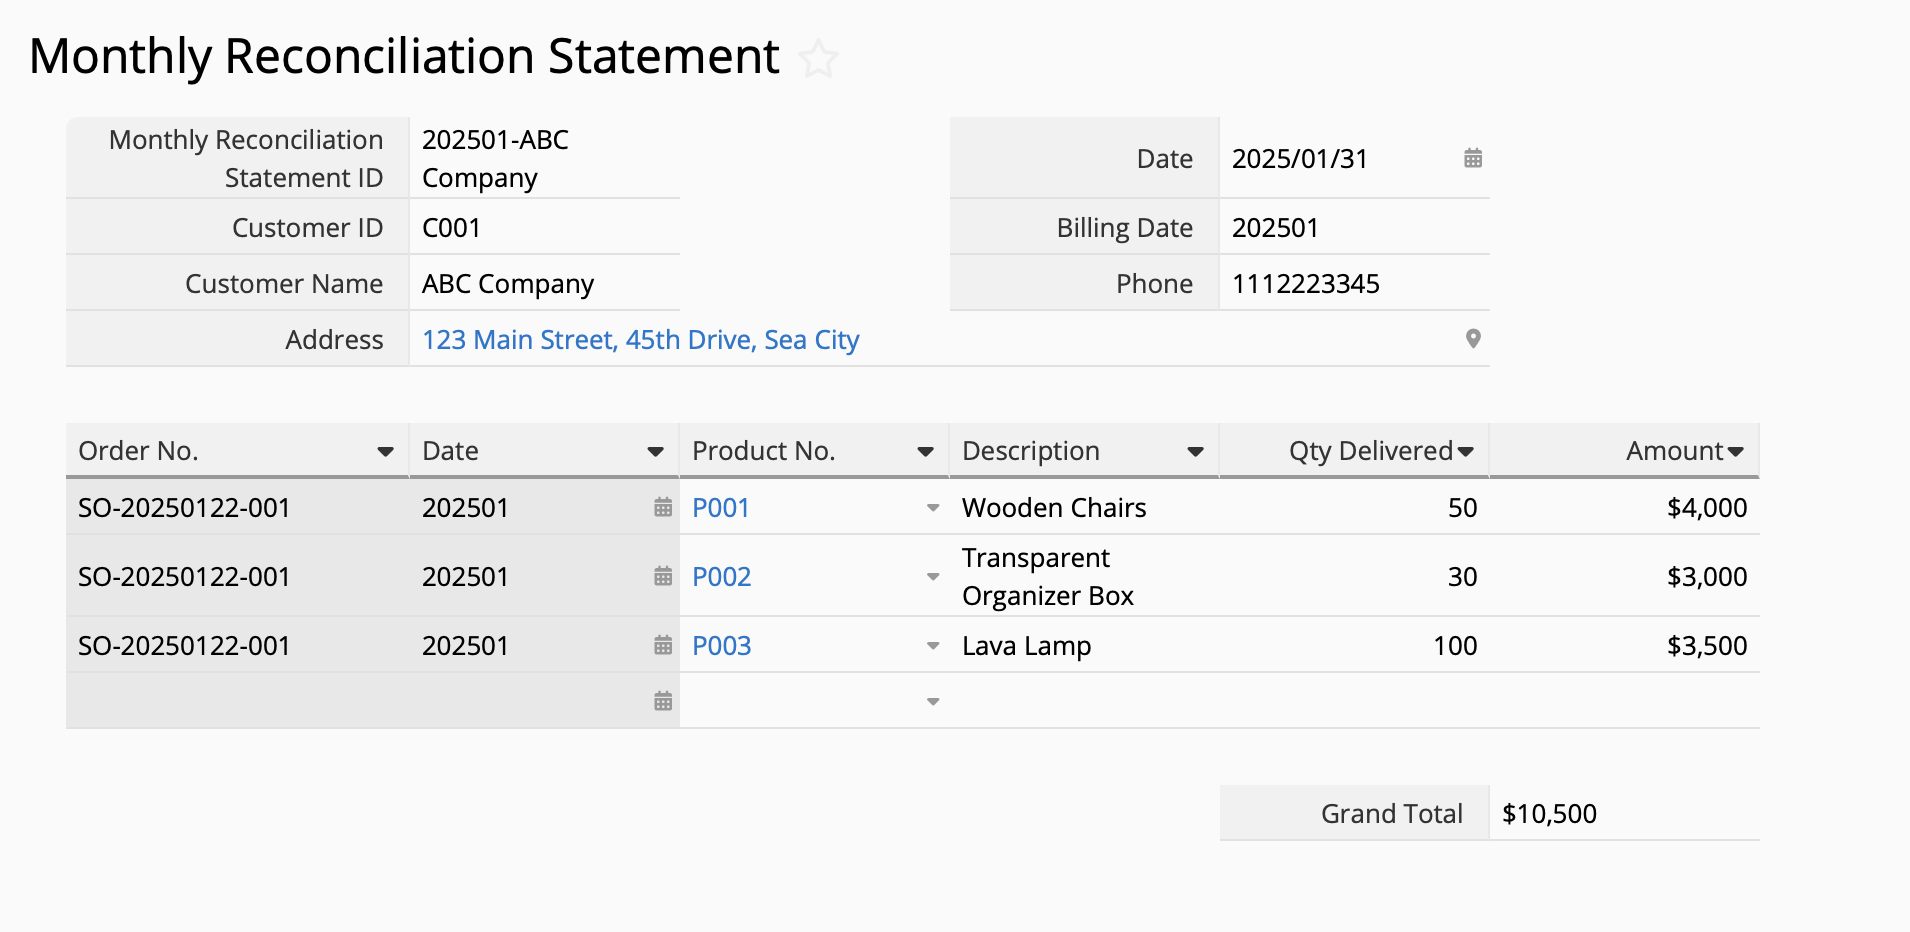
In other words, a reconciliation statement is created every month for each customer, which includes fields such as the billing month and basic customer information. At the end of the month or statement date, the statement automatically lists the sales details and amounts for that month, then calculates the total sales amount for the month, which is the amount due for settlement.
You can achieve this using the following methods:
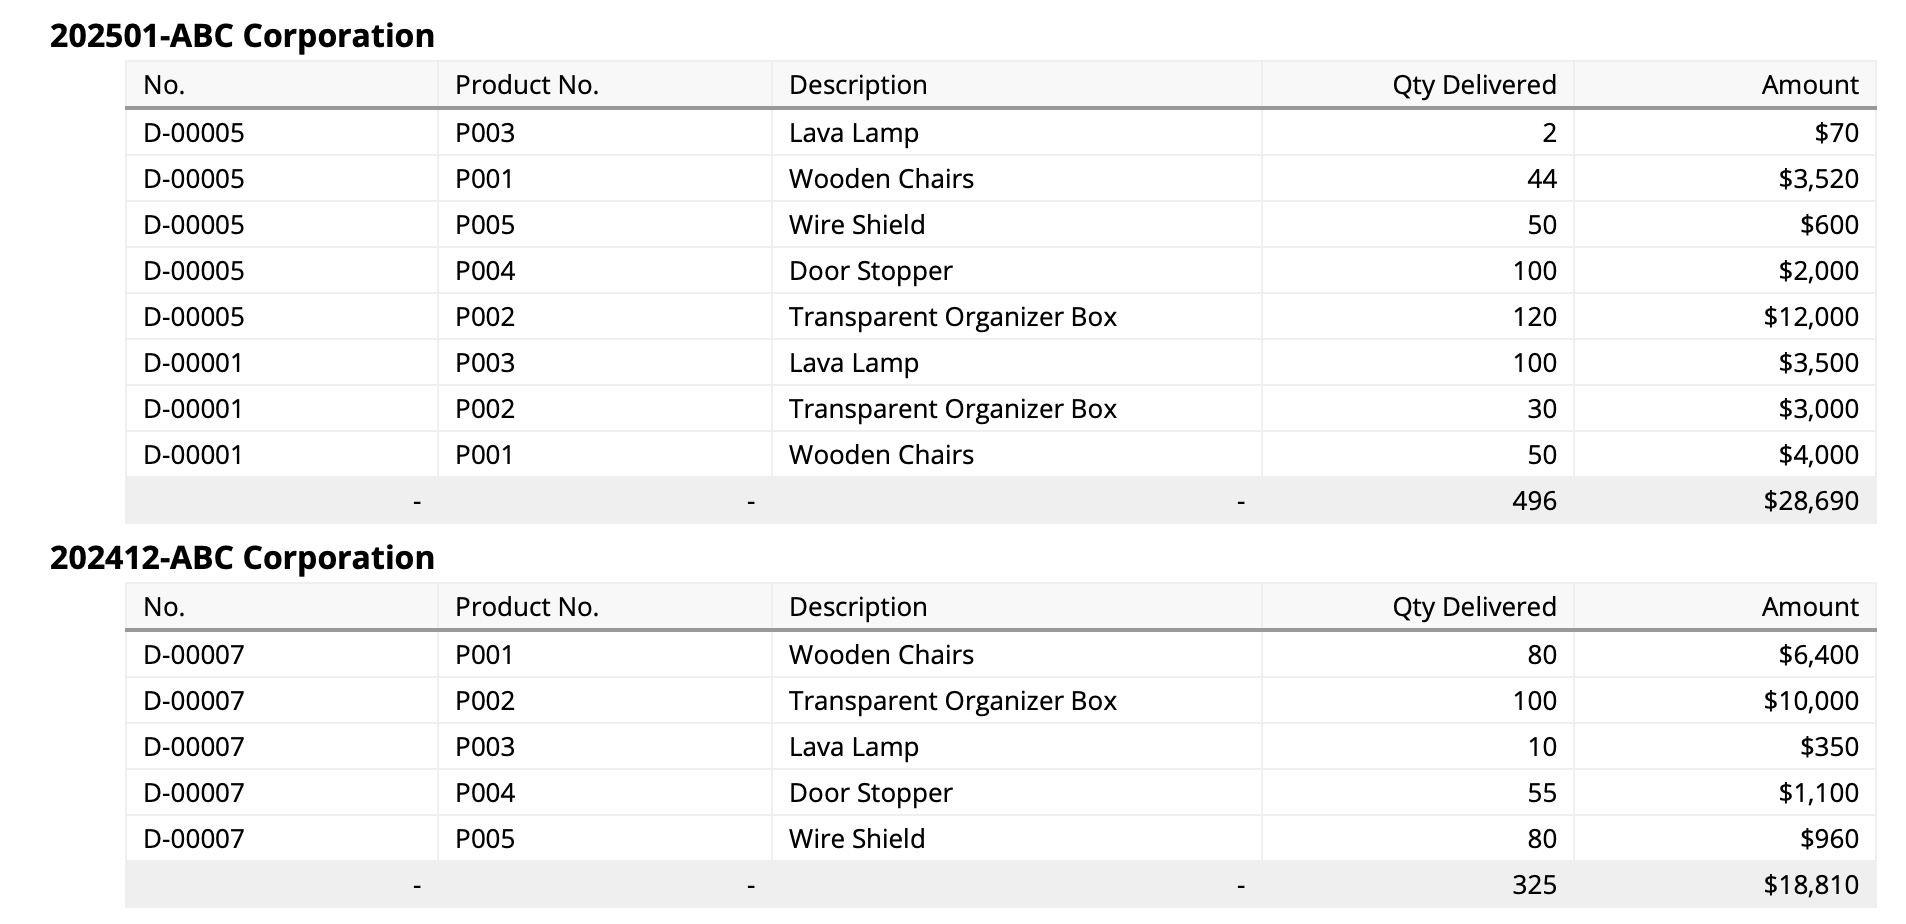
This method uses Ragic's "Grouping Report" feature to show sales details and grouping them as "one record per customer, per month". Since Grouping Reports can automatically add or sum numerical values within each group, you can use the generated report as a reconciliation statement and refer to it whenever needed.
Here are the steps to do this:
1. The reconciliation statement should list product delivery details, which come from the Subtable of the "Delivery Note". However, since Ragic currently does not support generating reports directly from Subtable data, we first need to use the New Sheet From Subtable function to convert the "Delivery Item" Subtable into an independent record. This will generate an independent "Delivery Details" sheet like below:
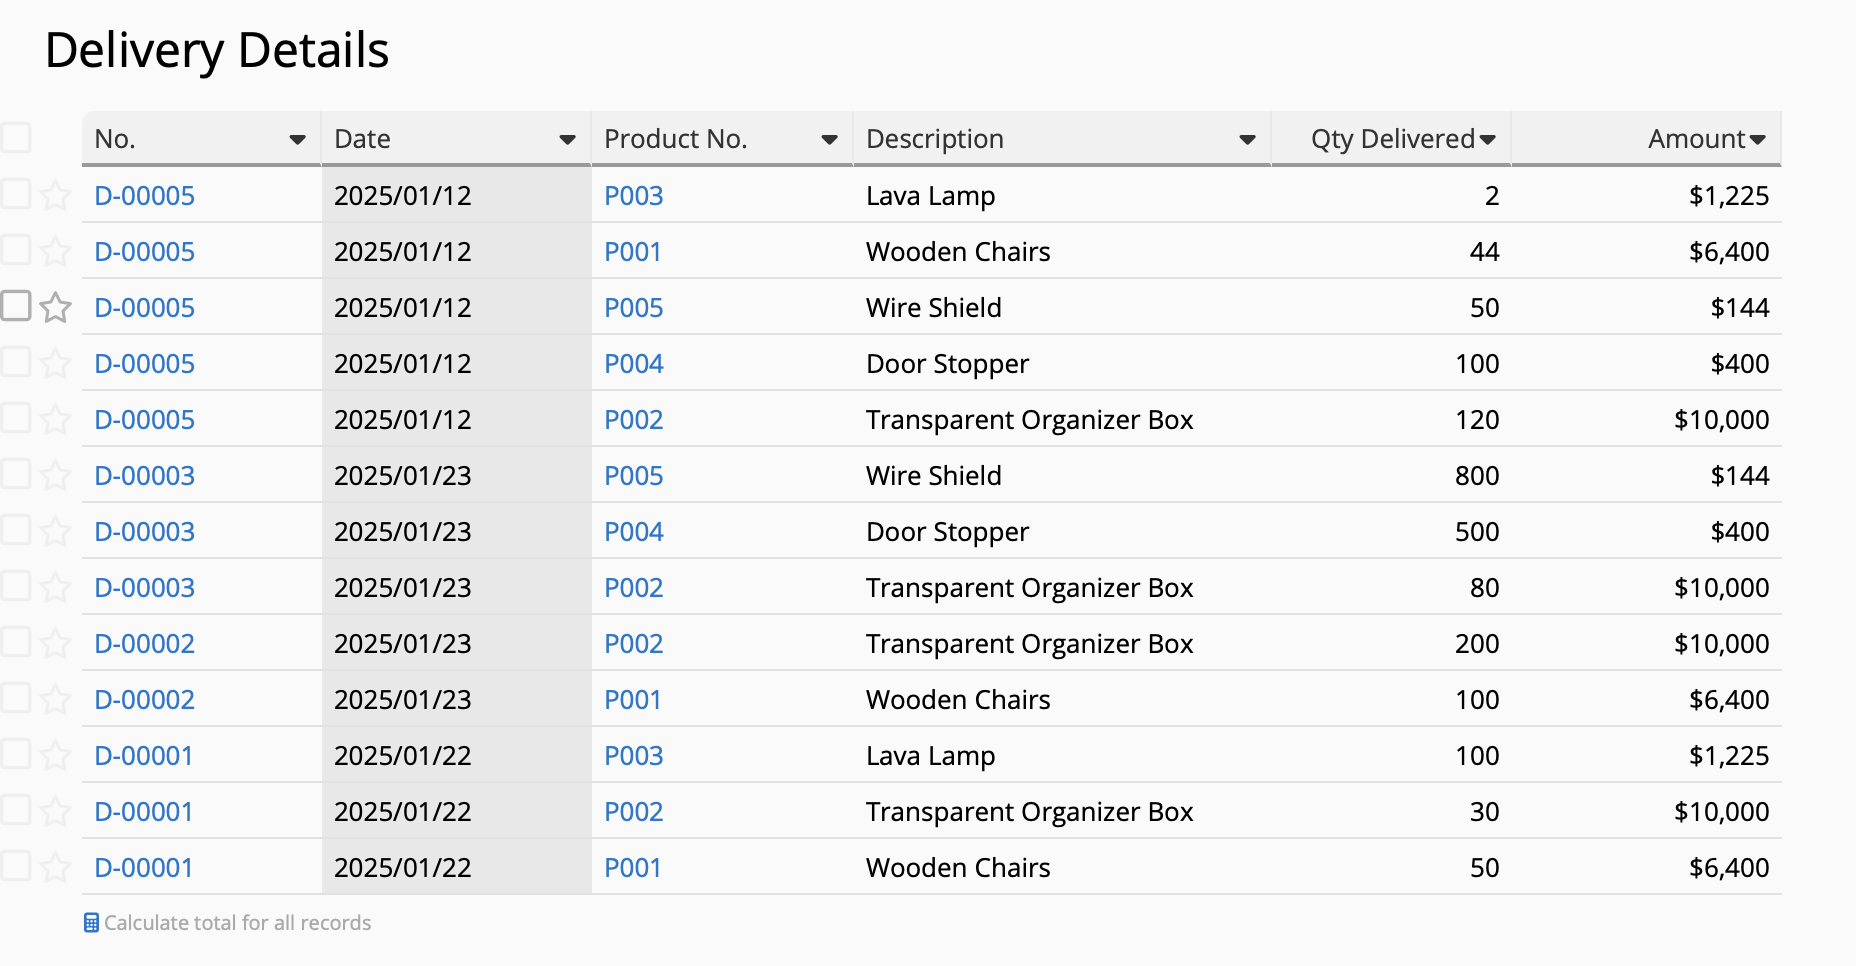
Some fields from the original sales invoice, such as "Customer" and "Date" are not part of the Subtable, but still need to be included in the new "Delivery Details" sheet. To include these fields, simply use the Link Field from Parent Sheets function to bring them into the new sheet.
2. Next, use the Report generation feature to create a Grouping Report from the "Delivery Details" sheet. For a simple scenario wherein the billing month corresponds to the shipment date's month, you can select "Date" as the "Group By" field and choose to group by month. Save and name your report as "Reconciliation Statement". When saving your report, select "Customer" as the Filter to generate reports that only show sales items for specific customers within the billing month.
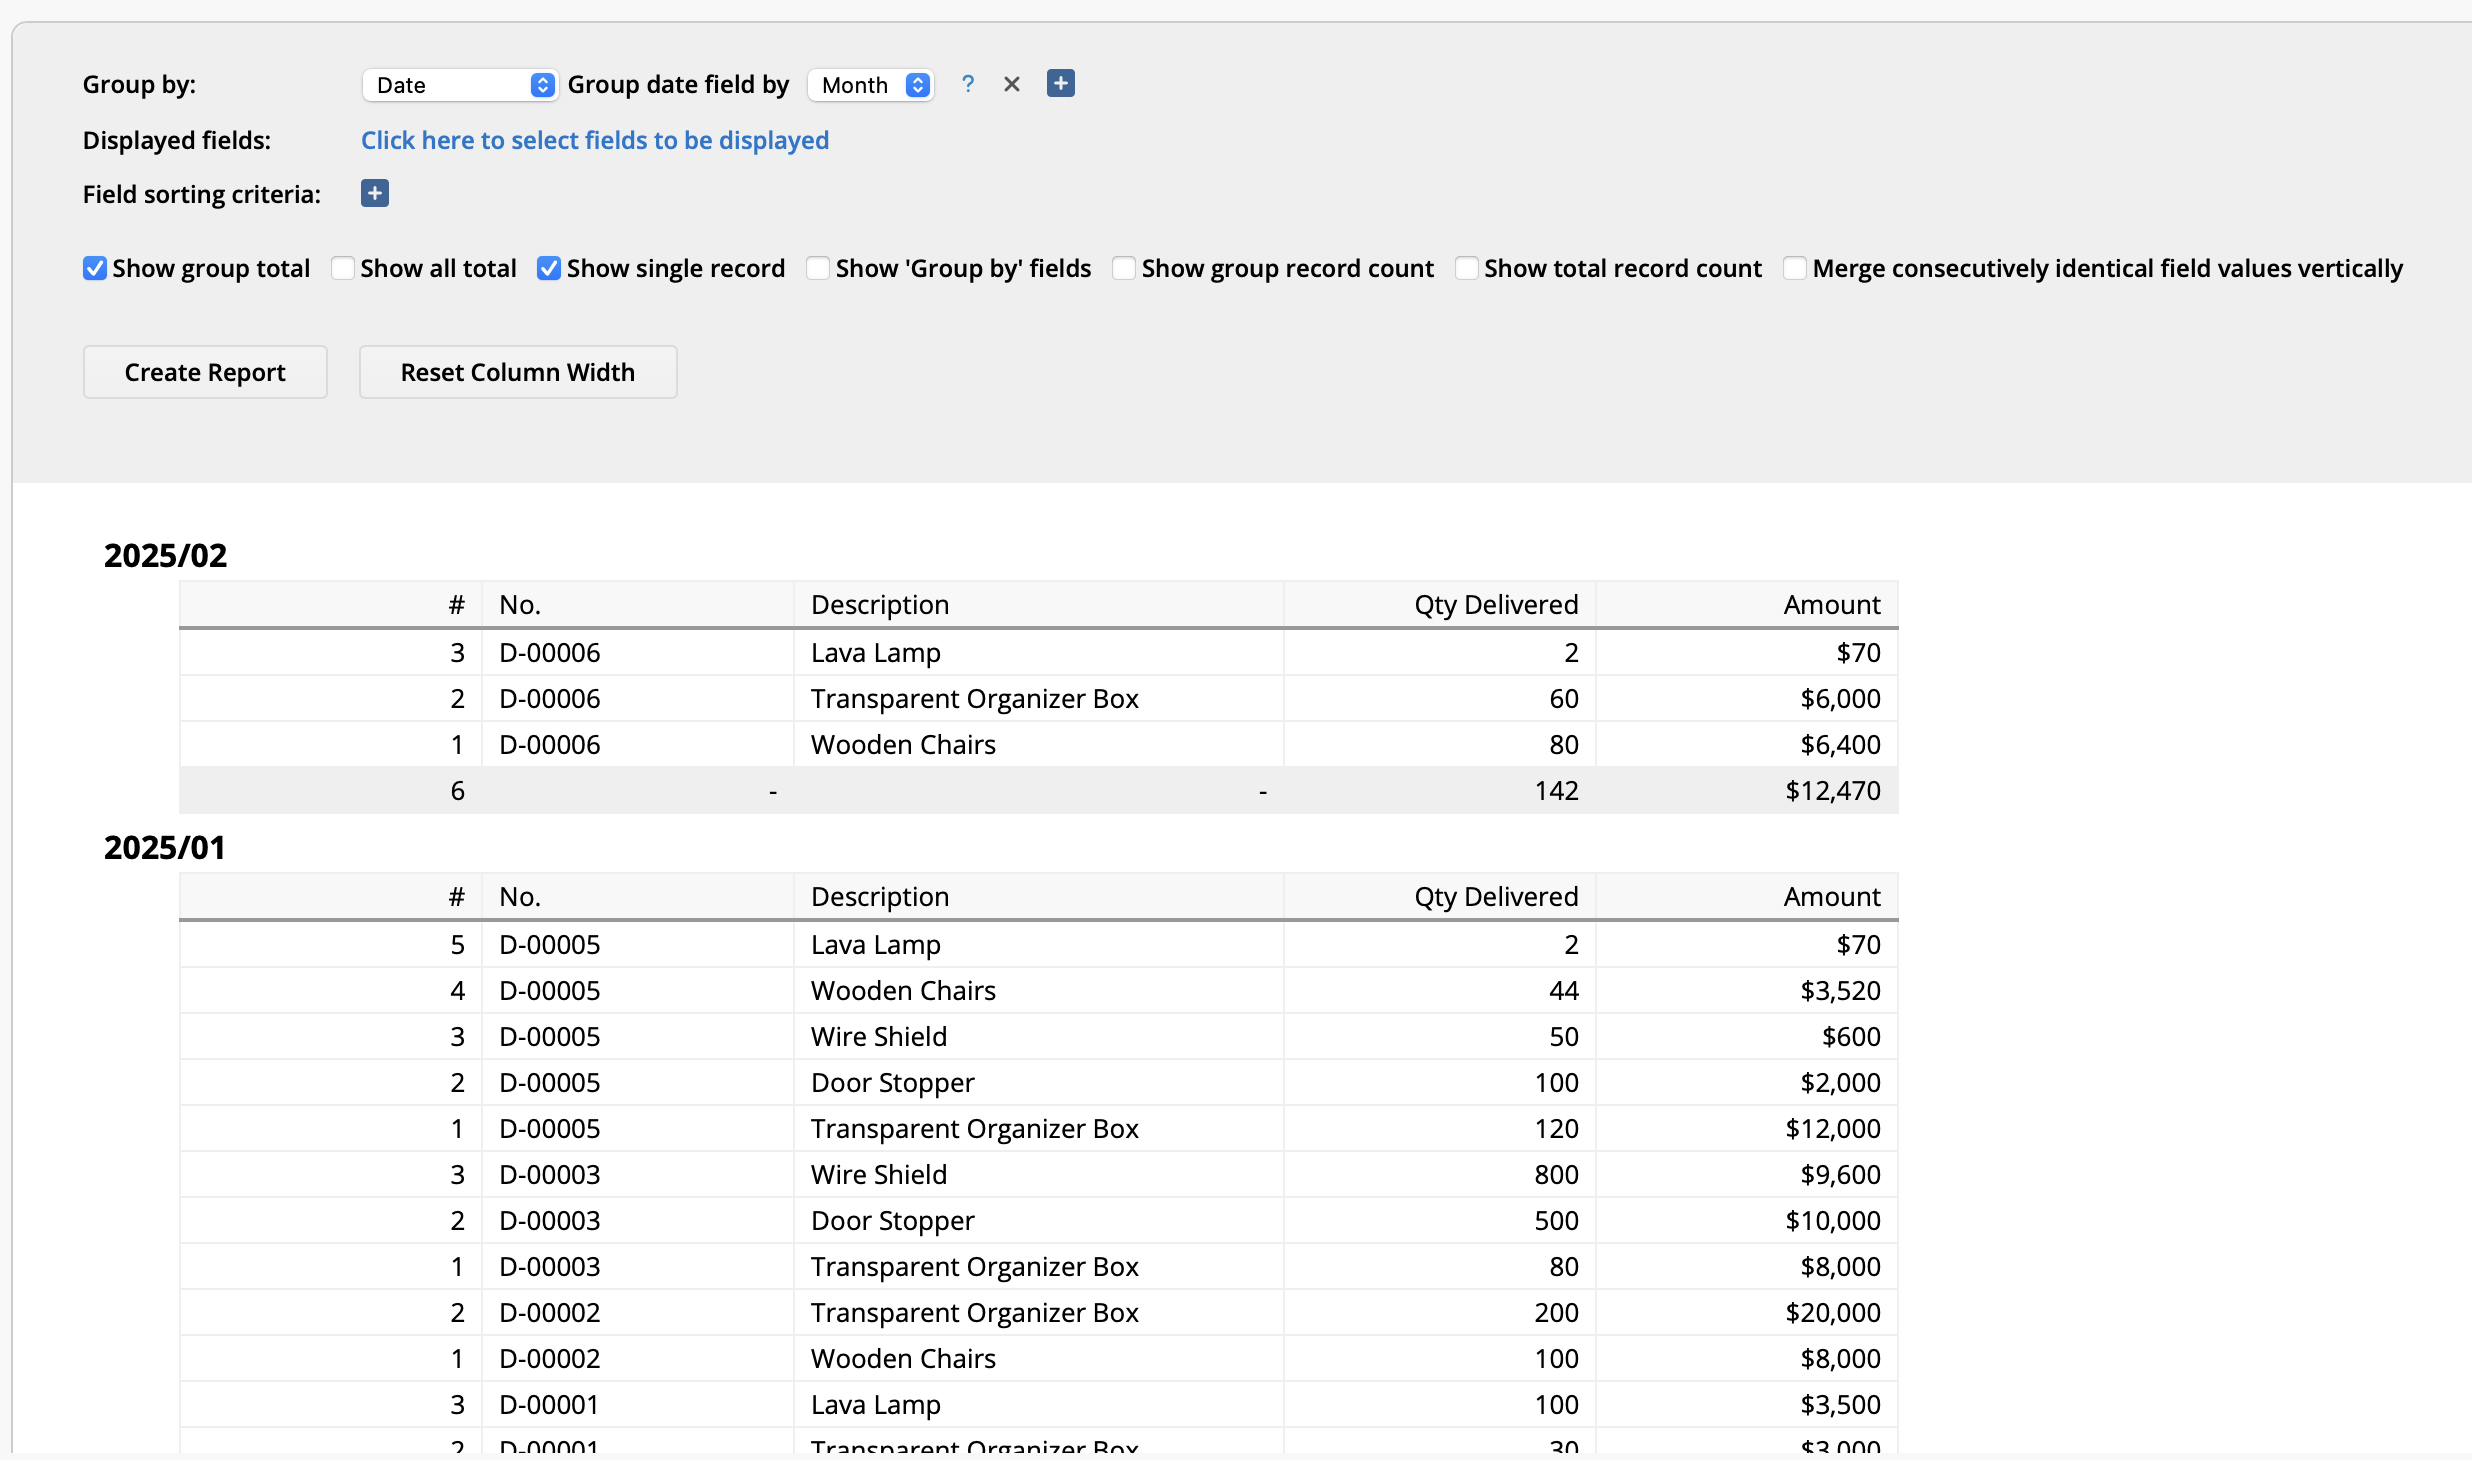
Feel free to take the opposite approach and set "Customer" as the "Group by" field and Billing Month as your Filter. Additionally, you can choose a specific field for sorting (eg. Date). Remember to tick the "Show group total" box to show each section's total amount.
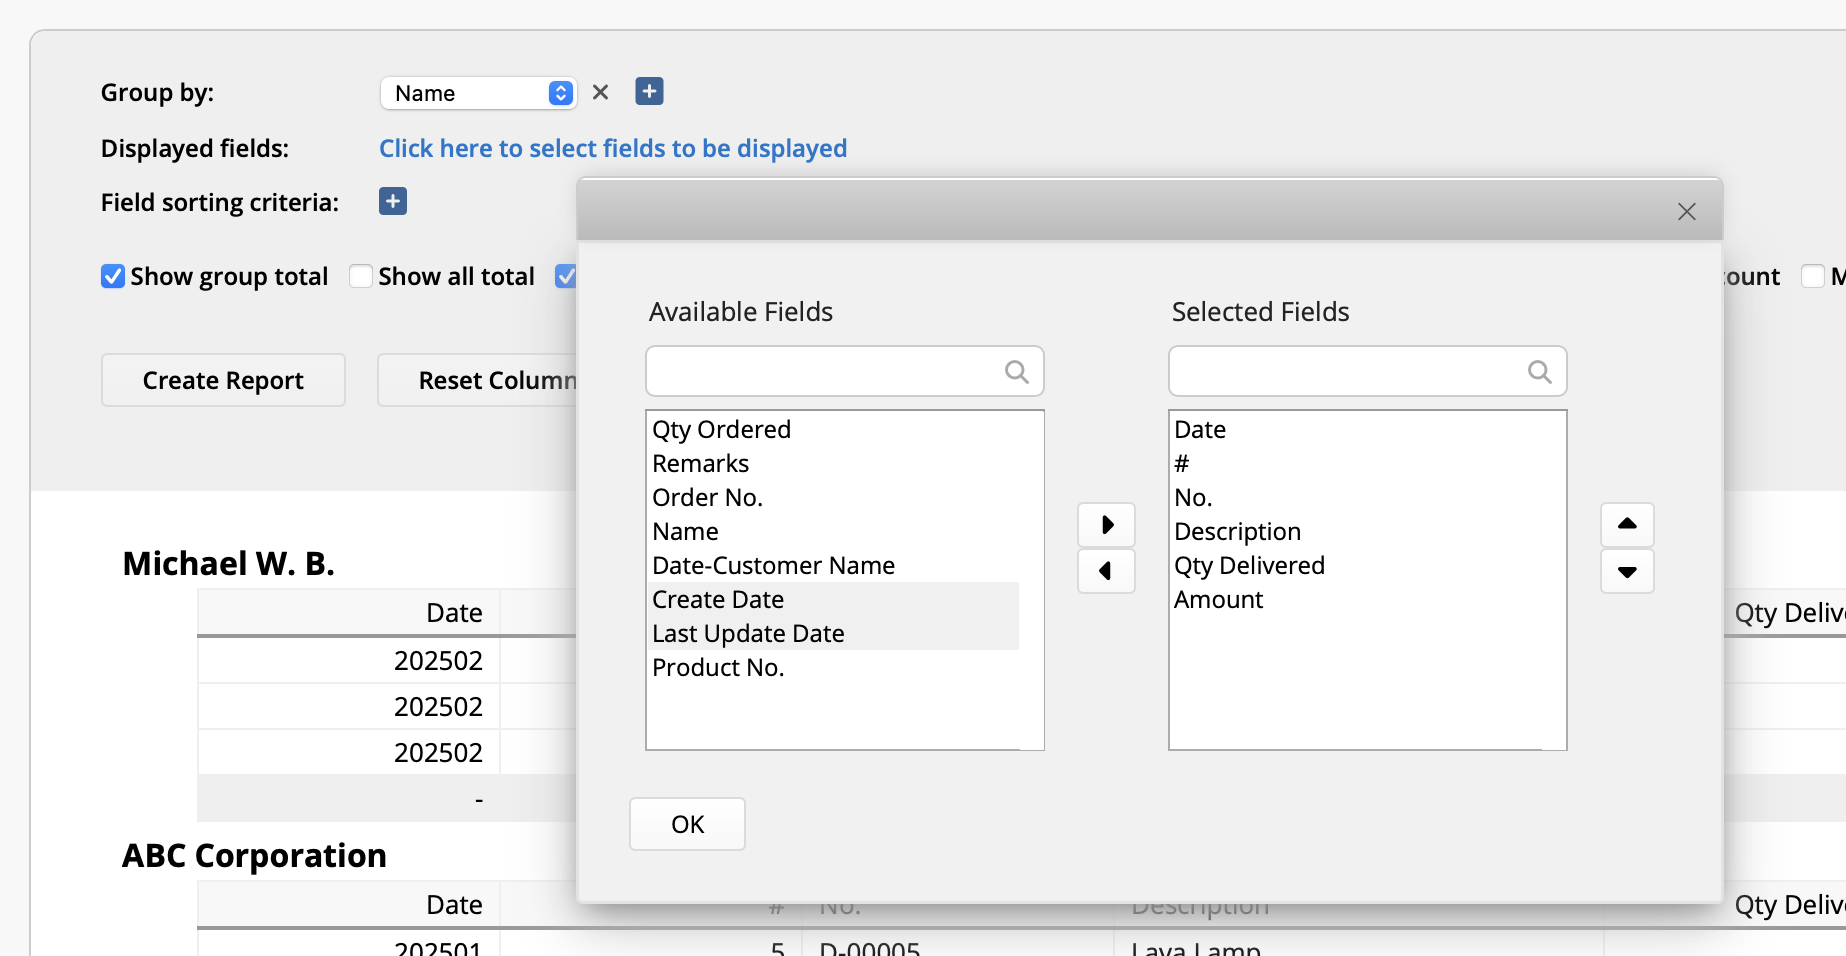
If you don't see the field you want in the Group by selection menu, select the "Click here to select fields to display in the report" and move the desired field to the "Selected fields" area.
If you don't want to manually filter customers every time you're accessing the report, or if you would like to add additional notes for the billing month, you can create the "Billing Month" and "Billing Month - Customer" fields directly on your "Sales" or "Shipping Invoices". The "Billing Month" field can be automatically populated using formulas, while the "Billing Month - Customer" field can be generated using a String Formula such as C1+"-"+A3, where C1 is the "Billing Month" field and A3 is the "Customer" field.
Once created, you can then add these fields into your Sales Item sheet using the Link Field from Parent Sheets function mentioned earlier.
If you need to make further calculations with the calculated fields from the reconciliation statement (eg. current month reconciliation amount/ current month receivable amount), you'll need to create a "Reconciliation Statement" sheet in Ragic, rather than using the Report feature. An example would be if you would like to track the paid and unpaid balances.
Using the same "Delivery Note" sheet, follow these steps:
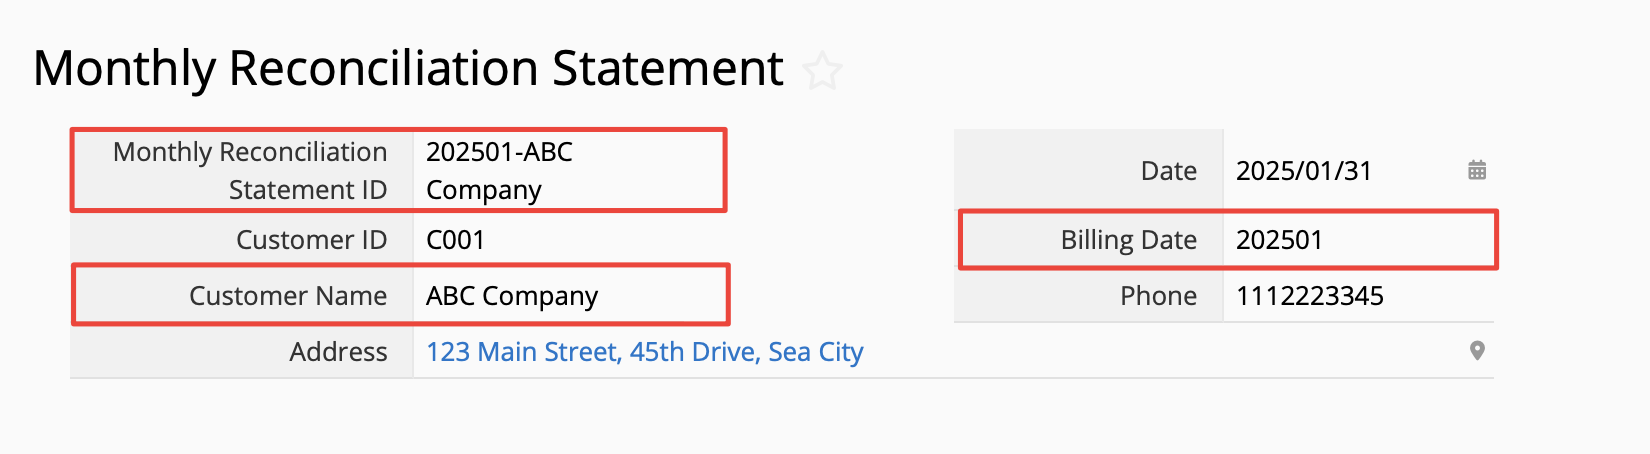
1. Create a "Reconciliation Statement" sheet, where each record represents one customer, for one month. Create a "Monthly Reconciliation Statement ID" field as your primary Unique Value as the unique identifier. Some examples are: "202501 ABC Corporation", "202502 ABC Corporation", "202503 ABC Corporation", "202504 ABC Corporation", and so on.
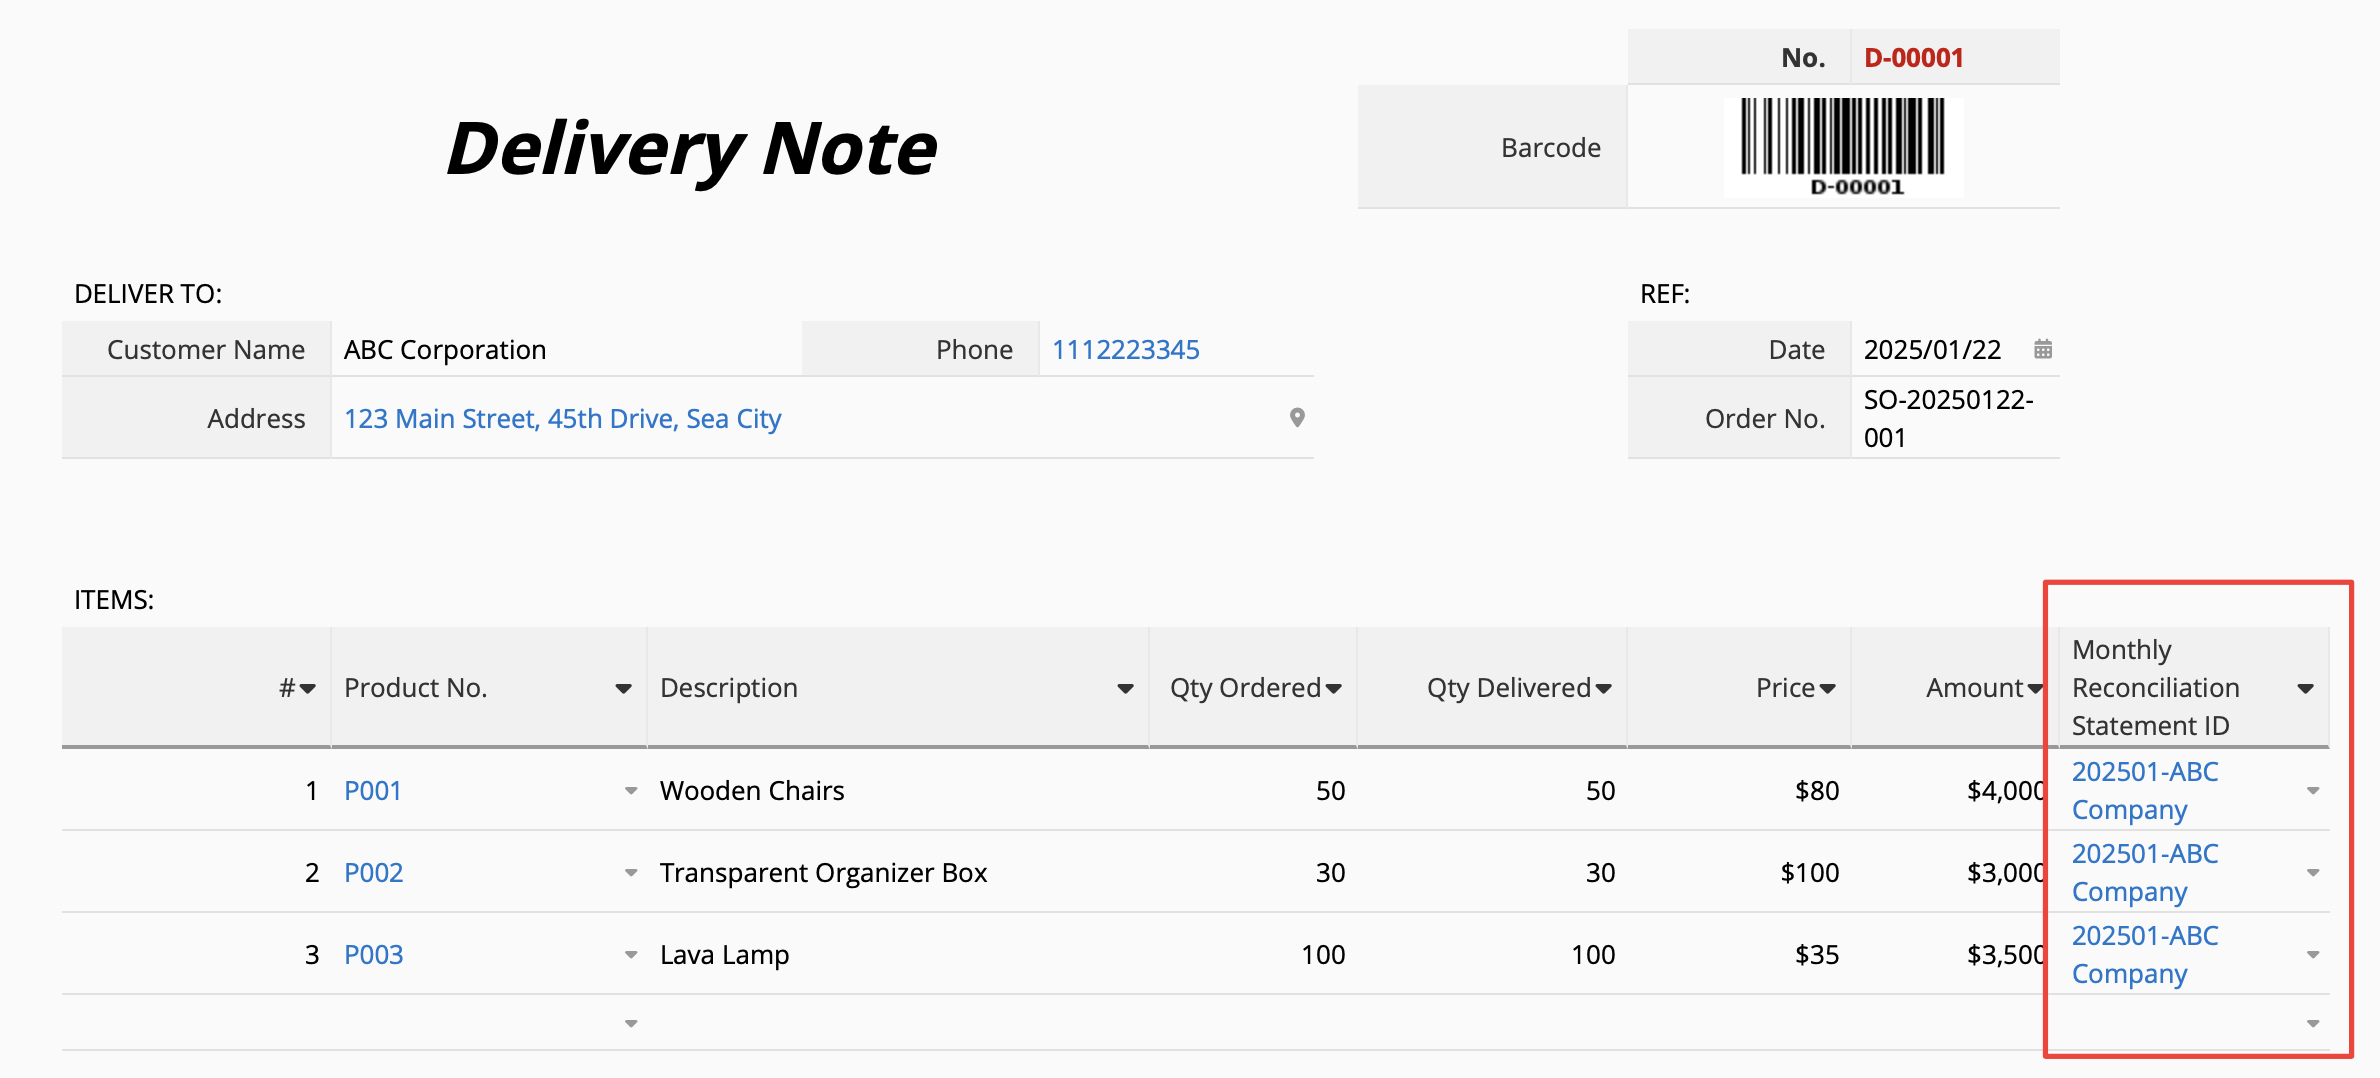
2. Create a "Monthly Reconciliation Statement ID" Field to the "Delivery Note" Subtable and create a link to the "Monthly Reconciliation Statement ID" in the "Reconciliation Statement" sheet.
Using this method, users must select the corresponding "Monthly Reconciliation Statement ID" whenever filling out "Delivery Note" details. If the reconciliation statement for the month has already been created and follows the "Month- Customer Name or ID" format, you can automate the selection by applying a String Formula into this field. By doing so, the "Reconciliation Statement ID" will automatically be filled in (or selected) when users enter the "Customer Name" and "Month".
3. Similar to earlier, use the New Sheet from Subtable function to convert the delivery items into an independent "Delivery Details" sheet. Ensure that the new sheet includes the "Monthly Reconciliation Statement ID" field.
4. Return to the "Monthly Reconciliation Statement" Sheet. Since the "Delivery Details" Sheet's "Monthly Reconciliation Statement ID" field is linked to the "Monthly Reconciliation" sheet, you can use the Show References From Existing Sheetss function to retrieve the "Delivery Details" for that customer, for the month. Finally, add an "Accounts Receivable" field. Apply a formula to SUM all the amounts from the linked "Delivery Details", automatically calculating the total receivable amount for the month.
If you need to generate the "Monthly Reconciliation Statement" based on other documents such as "Sales Invoices", "Customer Purchase Order" numbers, "Shipping Notes", and the like, you can simply replace the "Delivery Note" in this guide with your preferred document type.
If you don't need to see each individual delivery item detail in the reconciliation statement and wish to only consolidate the "Delivery Note" numbers, you do not need to use the New Sheet From Subtable function to generate a "Delivery Details" sheet. You can directly use the "Show References from Existing Sheets" tool to insert the "Delivery Note" data as a Reference Subtable in your "Reconciliation Statement".
If you are from procurement or purchasing and need to create "Monthly Reconciliation Statements for suppliers or to track monthly accounts payable details, the same logic applies: Replace the "Delivery Note" in this guide with your "Purchase Invoice" or "Purchase Order" sheet, and replace "Customer" with "Supplier" to manage payables instead of receivables.
Previously, we have discussed about generating "Monthly Reconciliation Statements" using Grouping Reports and using Reference Subtables. Regardless of which method you use, a "Billing Month" field is required. Other than manually entering the values for this field, you can use a formula to automatically generate the billing month.
The simplest method is when billing month is equal to the delivery date's month. For instance, if the delivery occurred on 2025/08/25, then the billing month should be 2025/08. Assuming that "Delivery Date" is on field E1, you can use the formula: LEFT(E1,7) on your "Billing Date" field to automatically extract the year and month from the date.
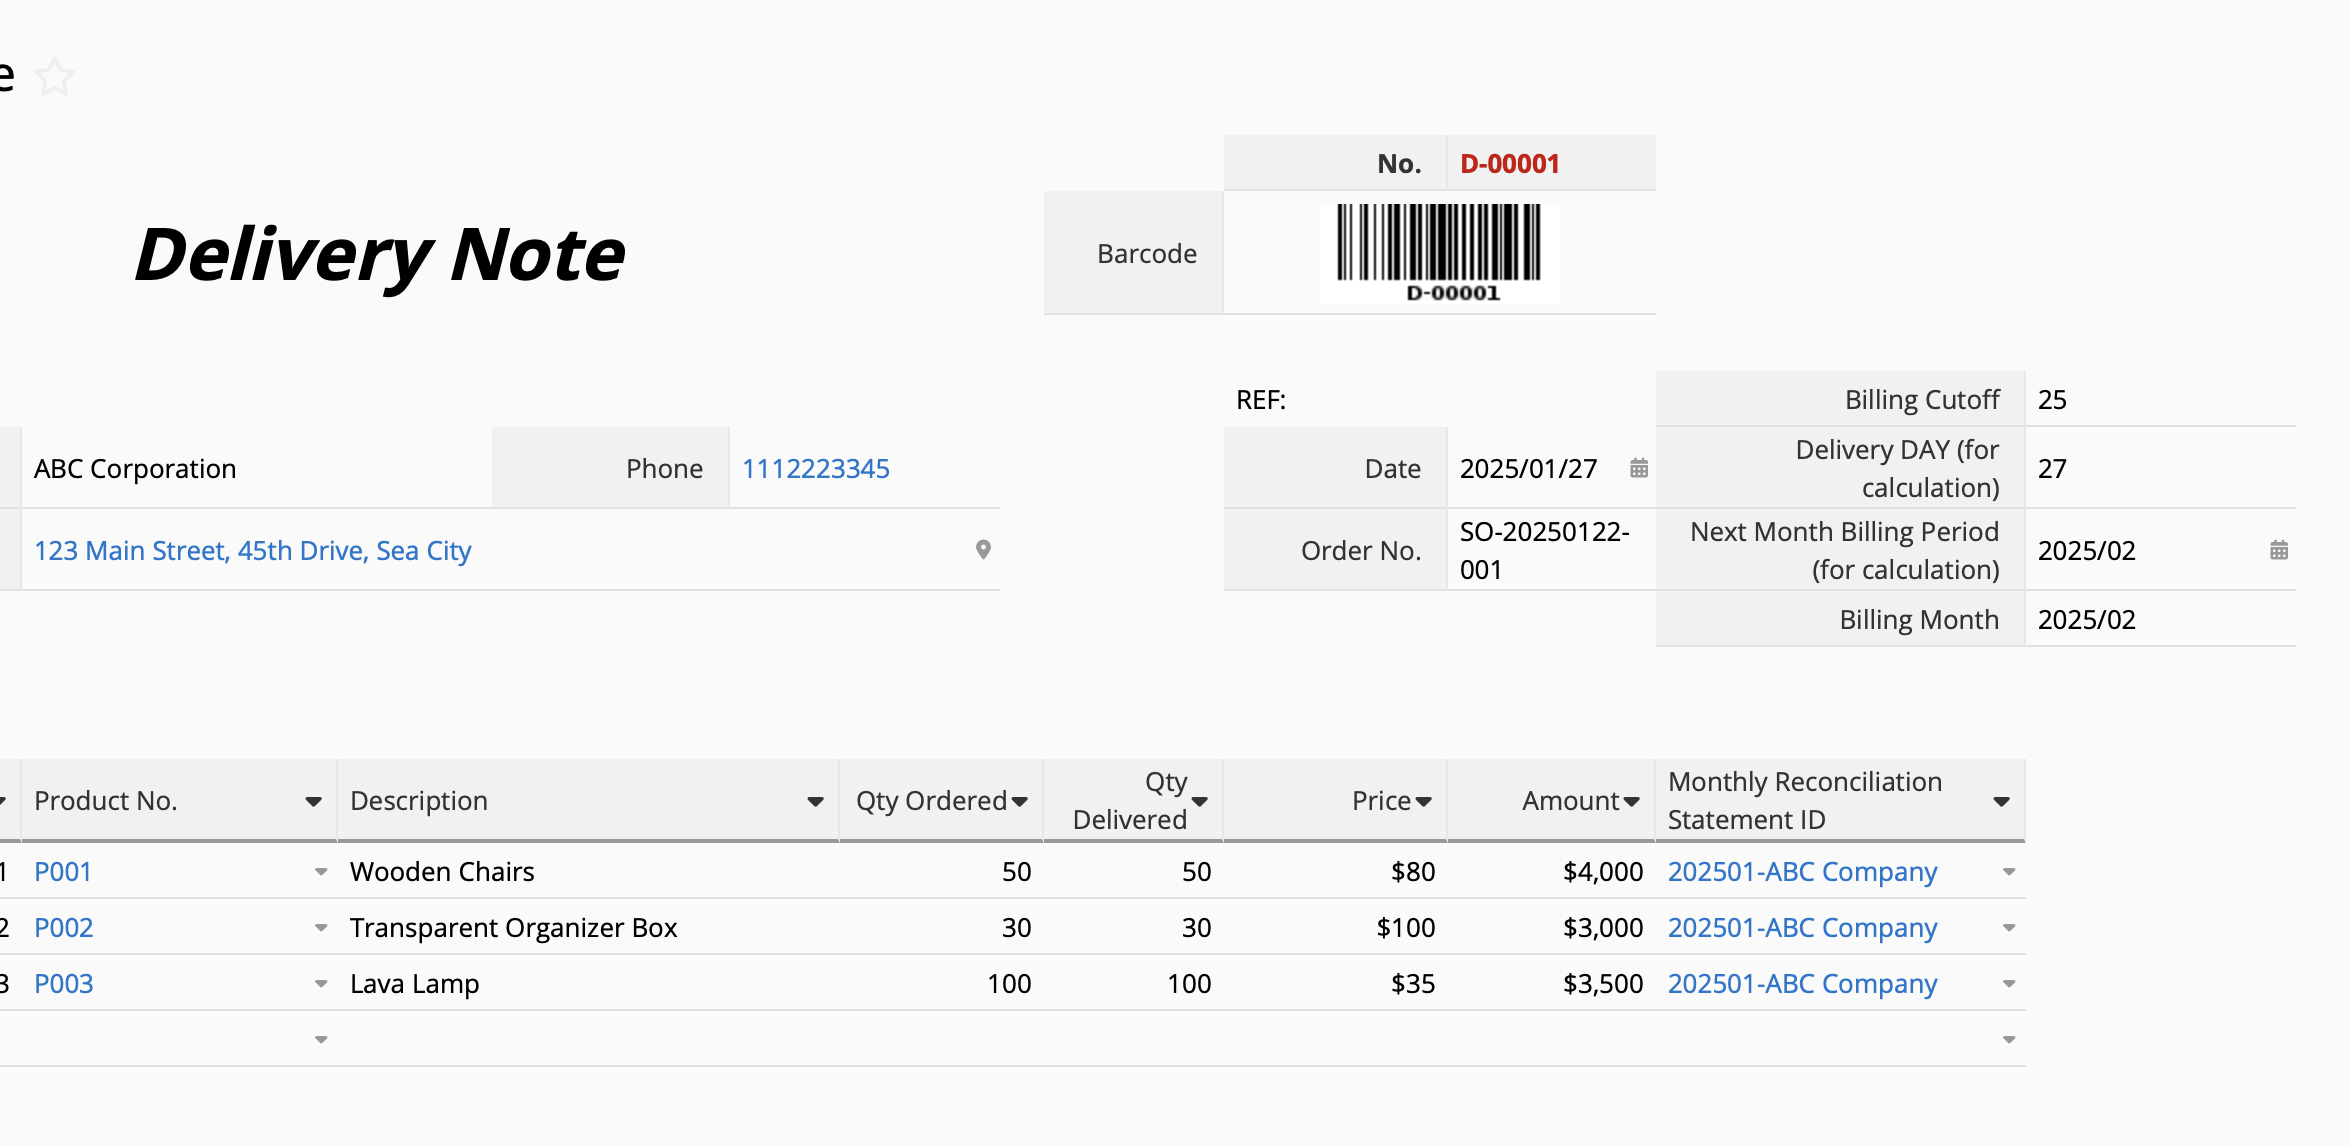
In practice, however, many companies do not use the "Delivery Month" for billing. Instead, they may have a cutoff date within each month, where transactions before this certain date belong to the current billing month, while transactions after the date will roll over into the next month. For example, if the cutoff date is on the 25th of each month, deliveries made on or before the 25th are billed in the current month, while deliveries made after the 25th are billed in the next month.
If your company follows this method of billing, you can adjust the formula accordingly:
(This example uses the "Delivery Note" sheet, but you may apply this logic to other sheets as needed)
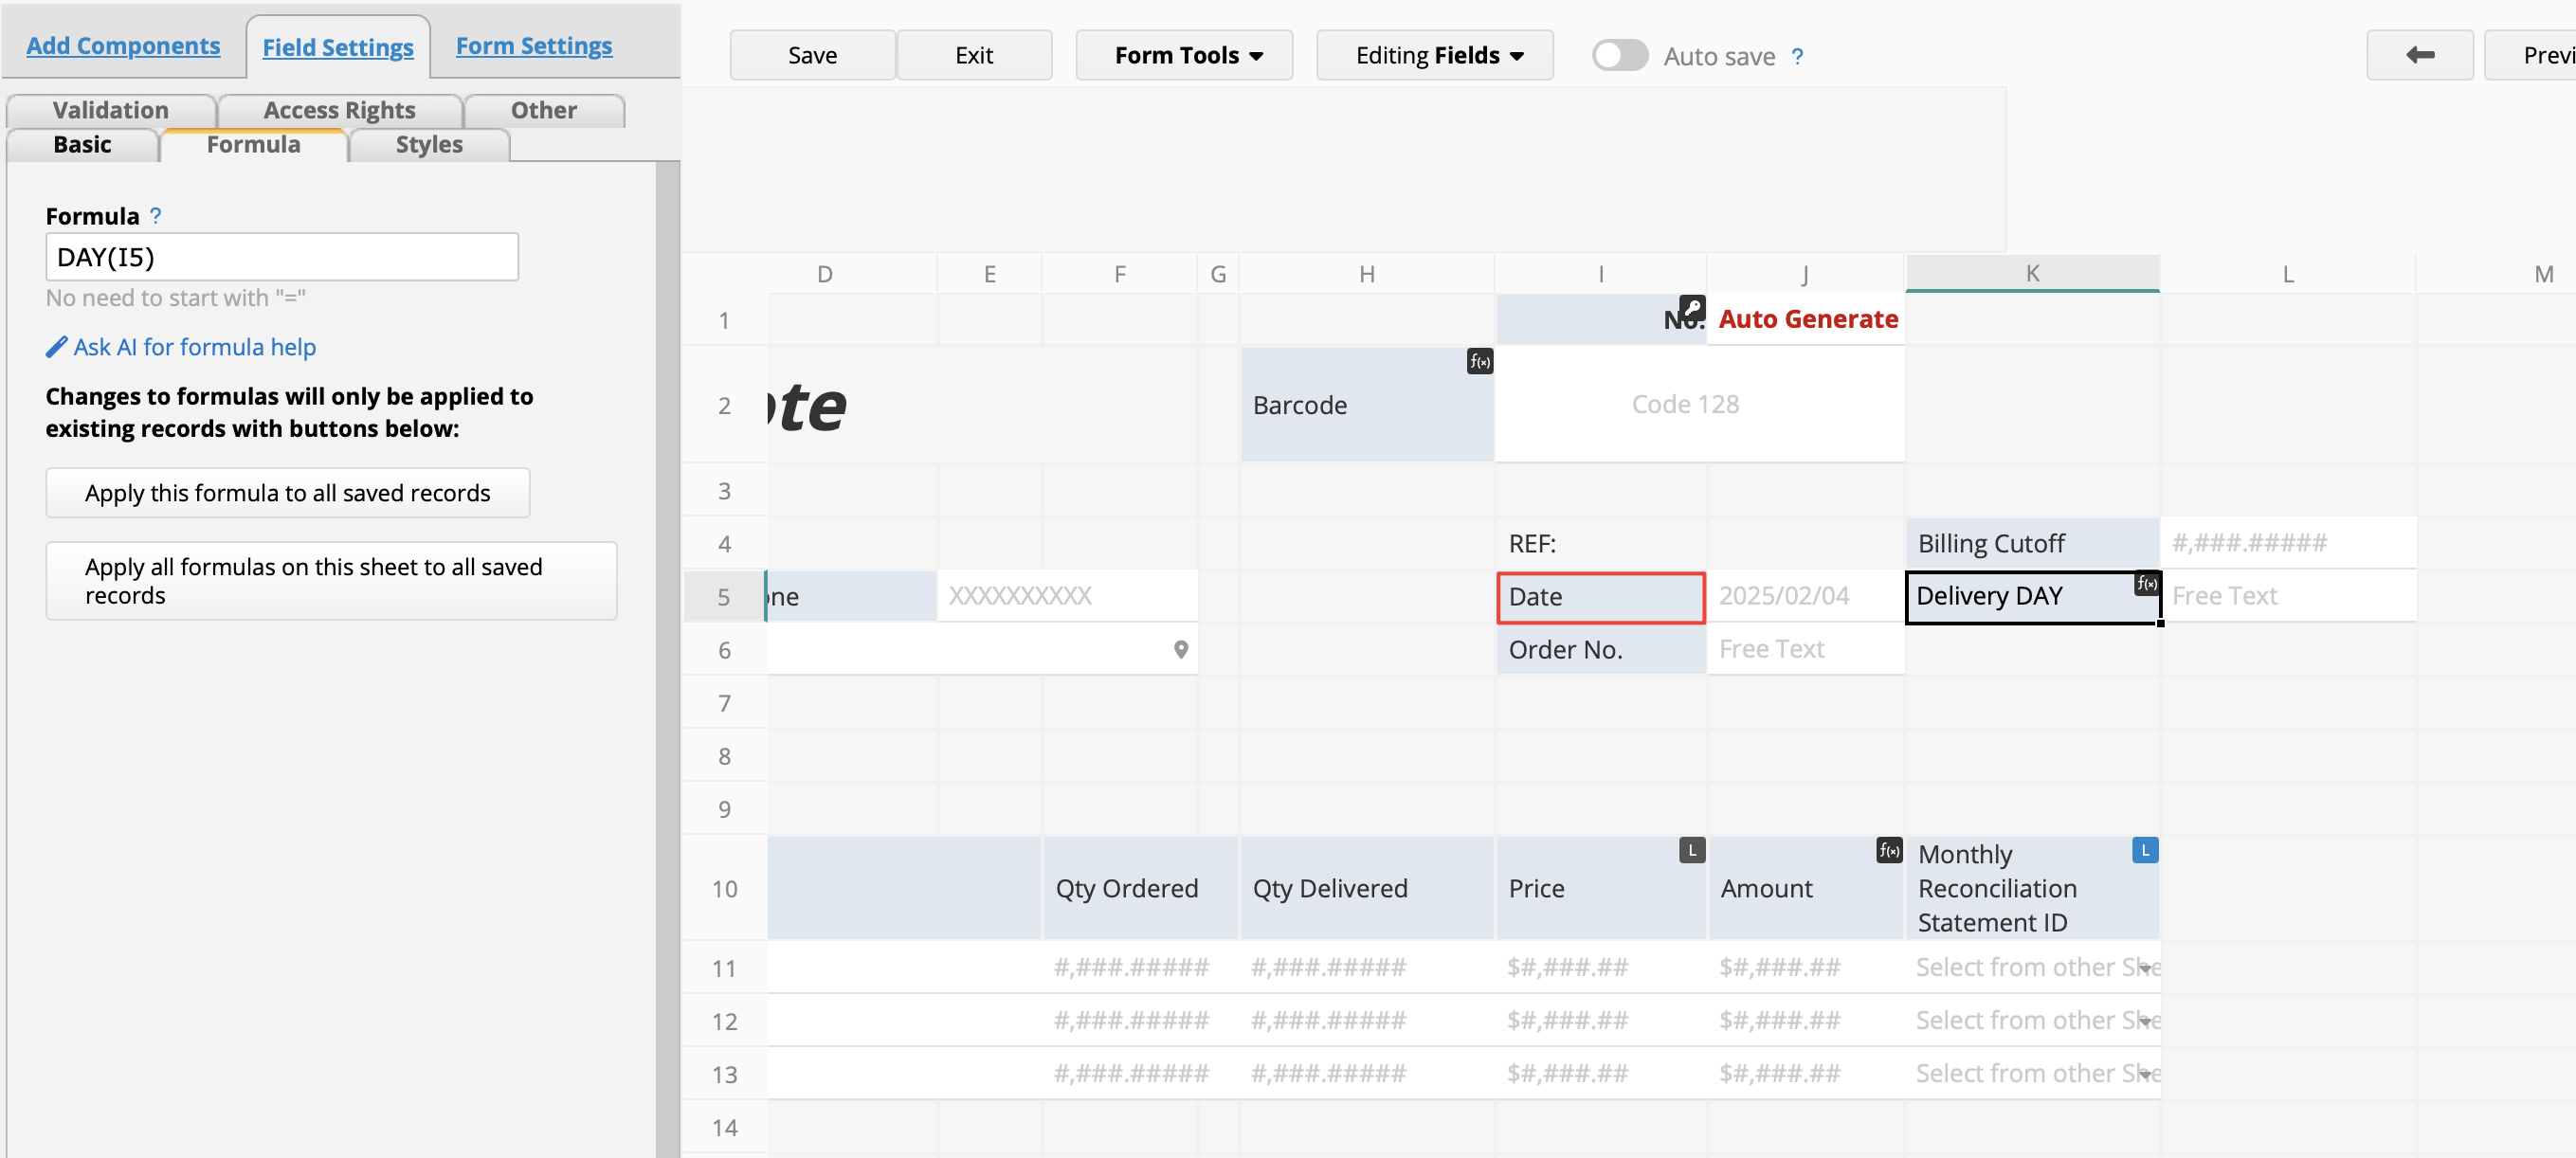
1. Create a Numeric field for the "Billing Cutoff Date", as shown in the screenshot below. The field in the example is on K4.
2. Add another Numeric field (K5 in this example), and use the formula DAY(I5), where I5 is the "Delivery Date". The extracted day will be used in further calculations.
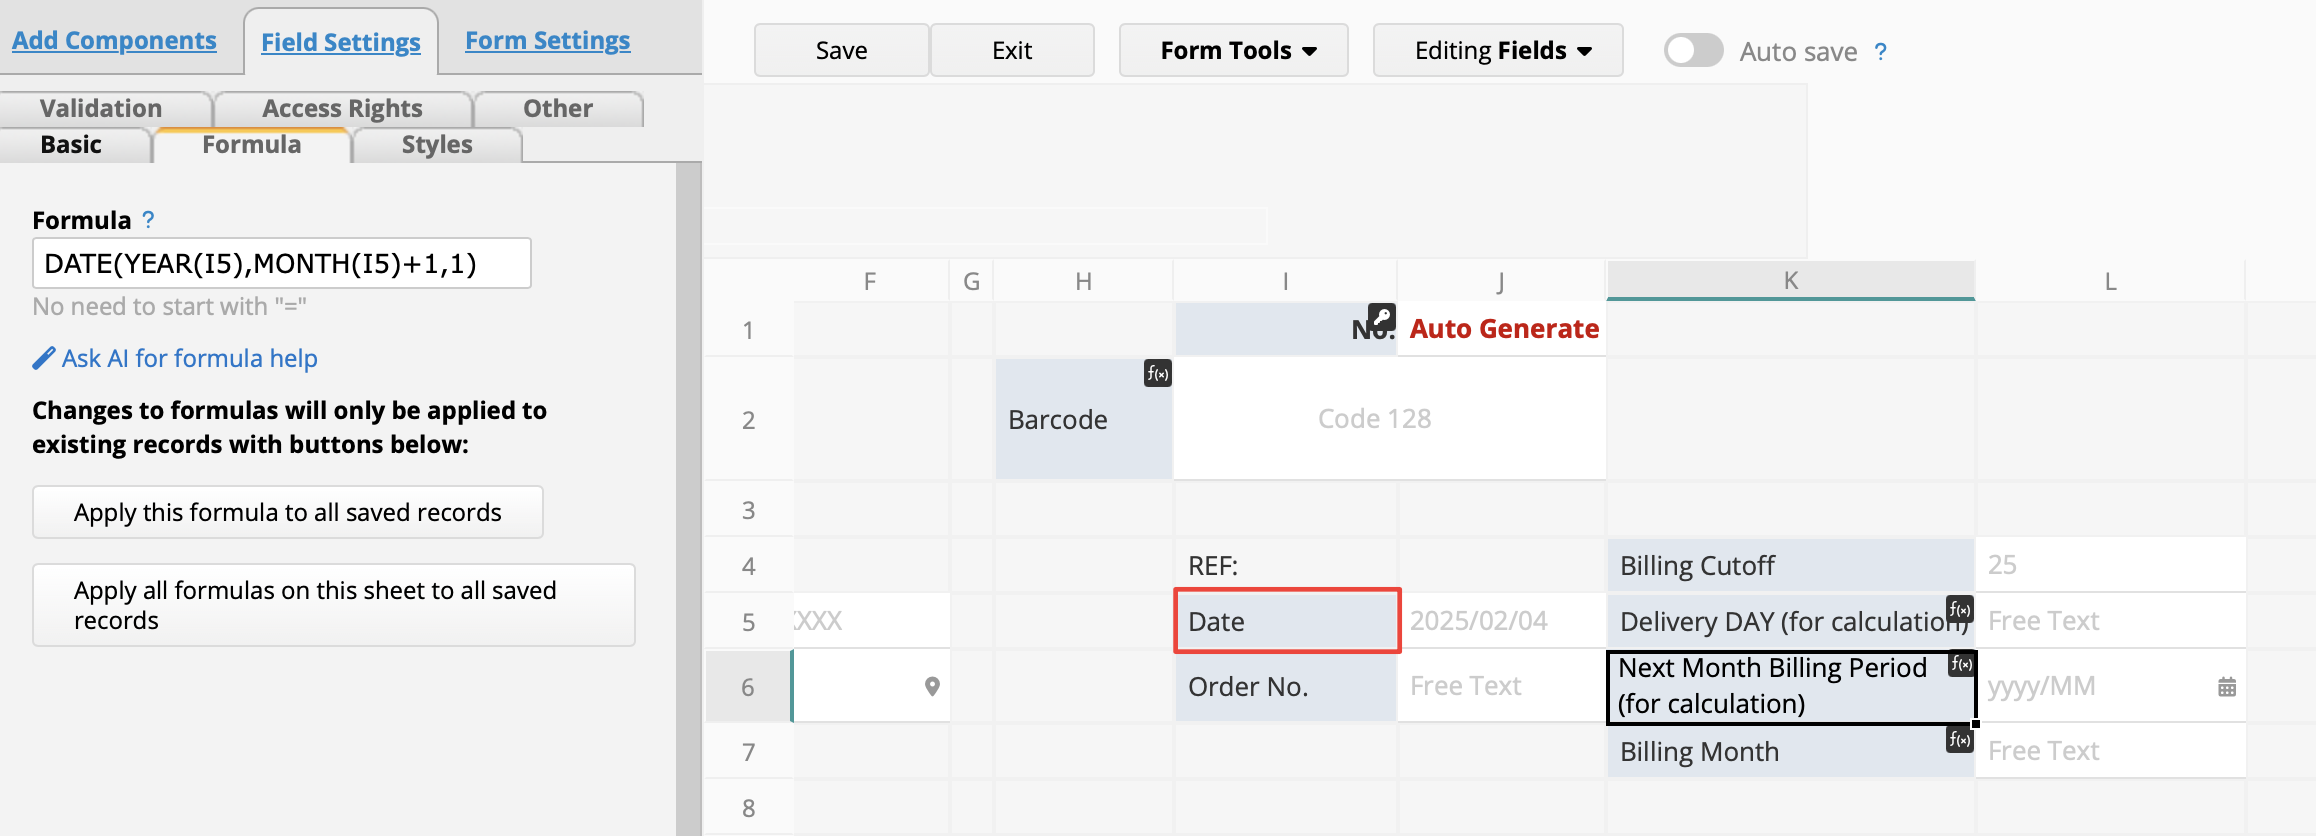
3. Create a new Date field. In this example, we place it on K6. We set the format as yyyy/MM to show year and month. This field is used to generate the next month's billing period based on the "Delivery Date" (I5) information. Use the formula: DATE(YEAR(I5),MONTH(I5)+1,1) , which extracts the year and month from the "Delivery Date" (I5) and shifts it to the first day of the following month. Since the format is in "yyyy/MM," only the year and month will be displayed.
4. Add a new Date field (K7 in the sample) for the "Billing Month", then use the IF() Conditional Formula for the system to determine which "Billing Month" the "Delivery Note" belongs to.
If K5 ("Delivery Date Day") is equal to K4 ("Billing Cutoff Day")+1, then return I5 ("Delivery Day"). Otherwise, return K6 (next month's billing period).
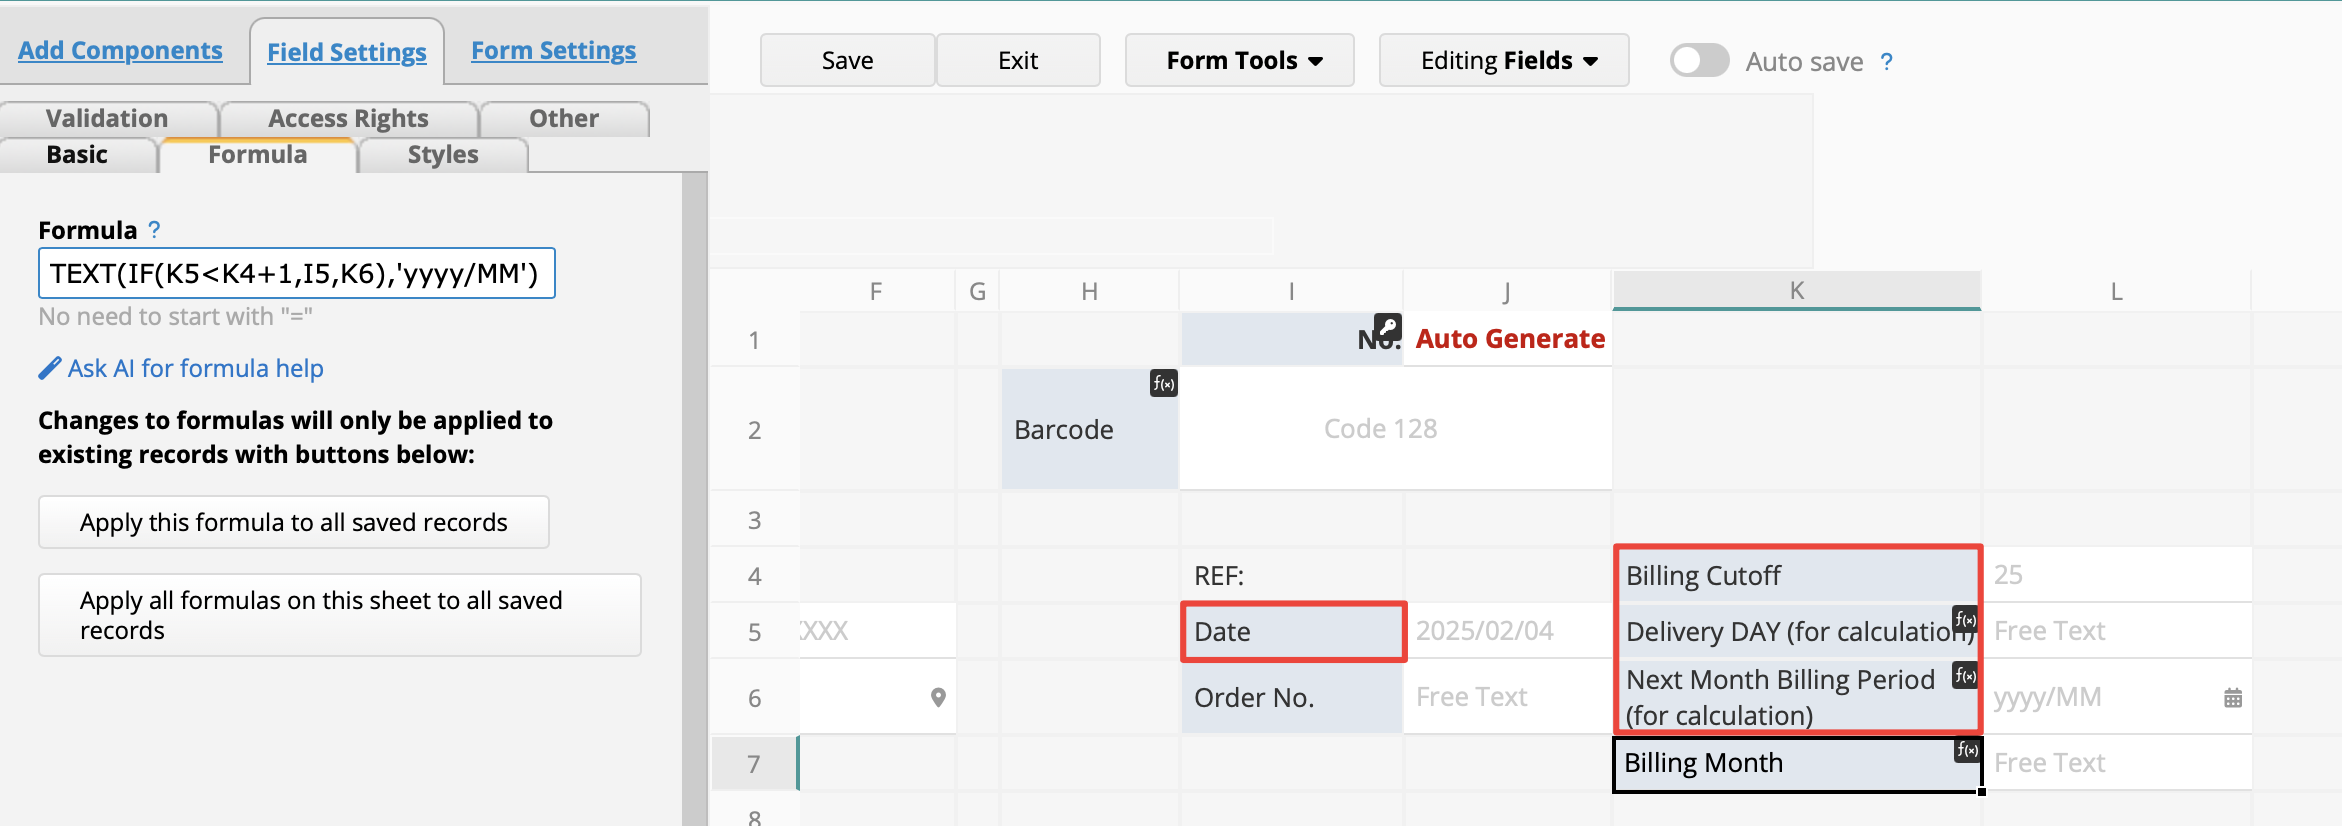
This way, if your "Delivery Note" date is greater than the "Cutoff Date", the "Billing Month" will show the next month.
If you find that these calculation fields clutter the page, you can Hide them through Field Settings and keep your sheet looking clean!
 Thank you for your valuable feedback!
