Are you still using Excel to manage your purchasing and inventory data? If so, are the formulas constantly giving you errors? Are all the unorganized files slowing you down?
Maybe you’re currently looking for flexible database software, but those available on the market are too complex and may not meet your needs. Also, it’ll be hard to make adjustments if you have someone else develop one for you. If you’re looking for a flexible application that can accommodate your industry and workflow, try Ragic’s PSI templates.
Our "PSI" template is comprised of three separate templates: "Sales Order Management", "Purchasing", and "Inventory Management". If you only need the functions of one of these, it can be installed separately as well.
If you don’t have a Ragic account, click here to sign up and install the "Sales Order Management" template, or click here to install the full "PSI" template set. This entire process is free, and we will not charge you without your consent.
If you are already a Ragic user, you can find the "PSI" template under the "Template Suites" category in Install Templates and click "Install" to download it.
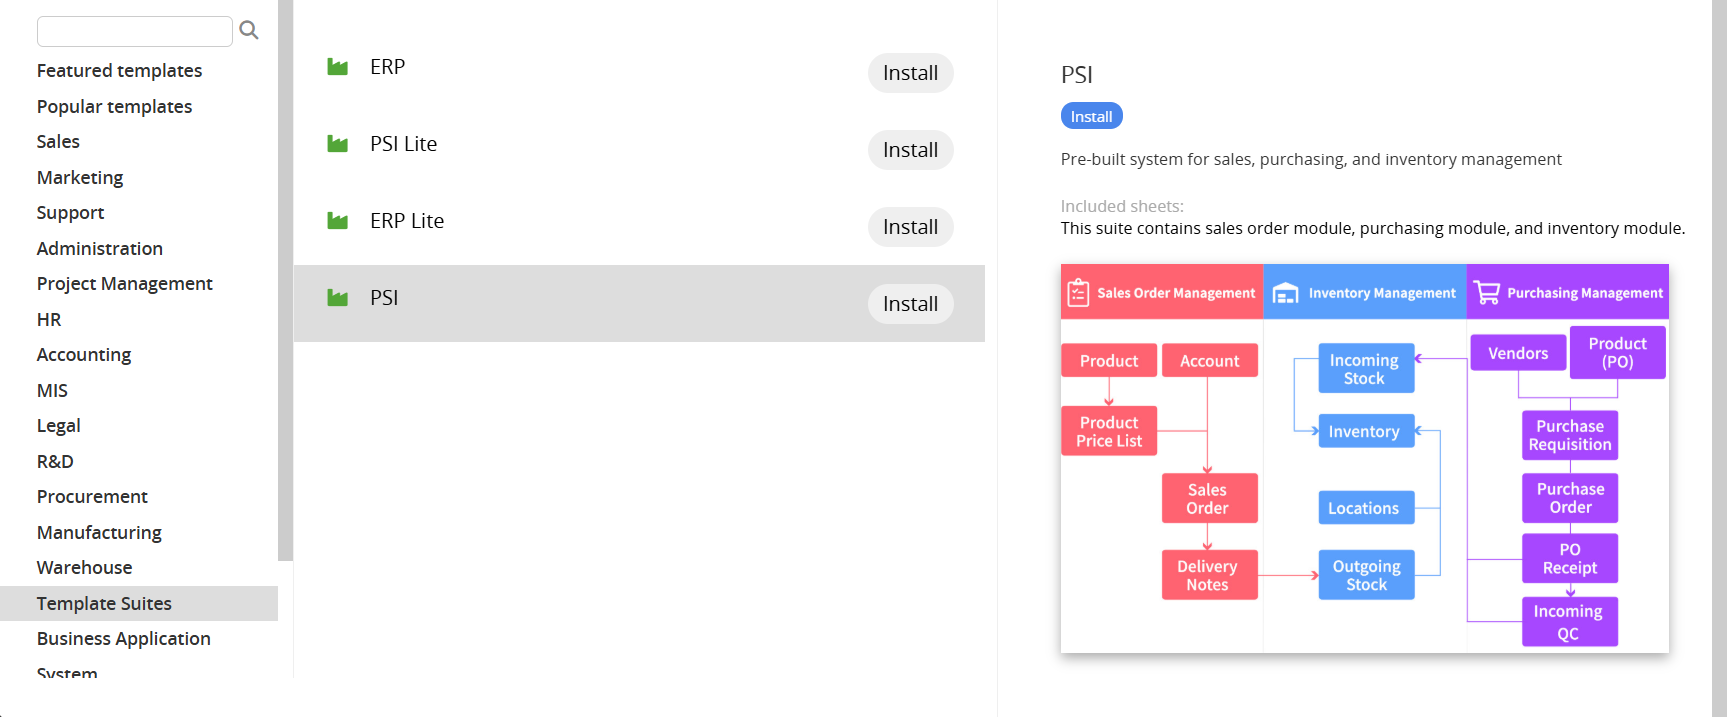
With Ragic's "Sales Order Management" template, you can effectively manage data of your accounts, products (pricing), and sales orders. The linking relationship between sheets has been designed so that you can choose the account and products (pricing) directly when creating a sales order. In the database, you can not only filter and confirm the status of the orders at any time but also convert sales orders into delivery notes directly to save the time wasted on manually entering delivery note information. If needed, Ragic also provides the feature to automatically send email notifications to customers. All procedures related to purchase orders can be completed directly within the database.
Please see the details below for the usage process of the Sales Order Management template.
The "Sales Order Management" template is mainly used for managing customer data, product (pricing) data, and the shipping process after the customer places an order. There are a total of five sheets, two product sheets ("Products" and "Pricelist"), one "Account" sheet, and two sheets ("Sales Orders" and "Delivery Notes") that manage the sales process.

The data should be added in the following order:
Products (SO) and Pricelist →(Accounts) → Sales Order → Delivery Note → (Stock Out)
The products in the Sales Order template are divided into two levels. One level is the "Products", which revolves around the products; the other is the "Pricelist", which revolves around the prices of the products. (For example, a product may have three prices; so there will be one record for the product information and three records for the product's prices.)
The "Products (SO)" sheet, the Inventory Management template's "Inventory" sheet and the "Purchasing" template's "Products (PO)" sheet are Multiple Versions; they share the same data source. In other words, when you add a new item to the "Products (SO)" sheet, the item will also appear in the "Inventory" and "Products (PO)" sheets.
Please note that when you add data into the "Inventory" or "Products (PO)" sheets, choose Sales products as the Category. That way the data will be displayed on the "Products (SO)" sheet. If you add a product directly to the "Products (SO)" sheet, the item will be automatically categorized as Sales products!
If you want to create your product data by importing from your own Excel or CSV file, remember to select the "Fill in default field values" option in the Advanced Settings for the import (the Category will default to Sales products).
Product No.: The serial number automatically generated by the system; if you’d like to use your own product number, you can modify this field after the data is saved. (Remember, the Product No. must be a Unique Value in the "Products (SO)" sheet.)
Category: Multiple selections can be made; Sales products must be selected for this record to show in this sheet.
Type: A Selection field. Option definitions for the type can be added by pressing the Add New in the menu.
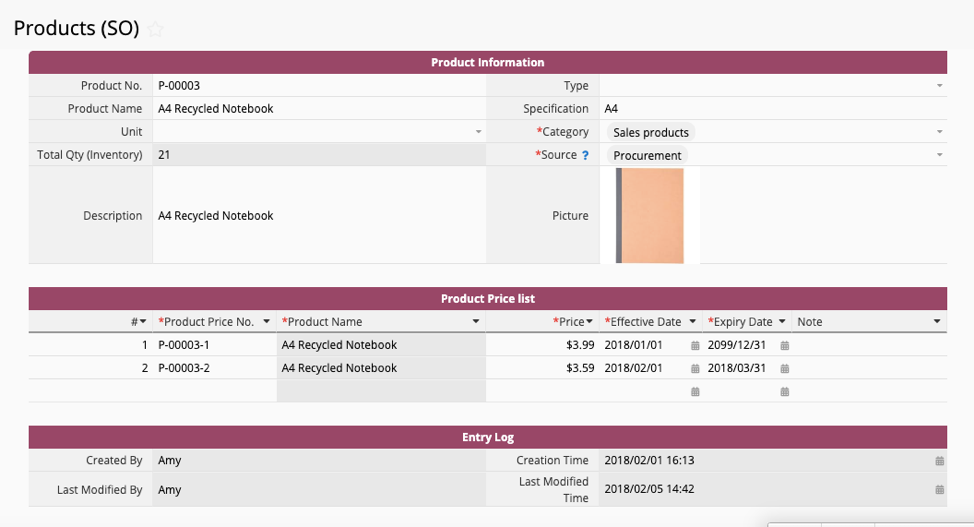
The sheet has a Subtable for managing the prices for the products, allowing you to multiple prices for each product.
The current value of the Product Price No. is Product No.-Price #. The value of the field is automatically populated by formula, and this is the Unique Value of the "Pricelist" sheet.
The default value of the Product Name is the original product name to avoid confusion caused by different names. The current formula references the product name and is set to Read Only (if you need a different name for different sales scenarios, you can remove the Read Only attribute and the formula).
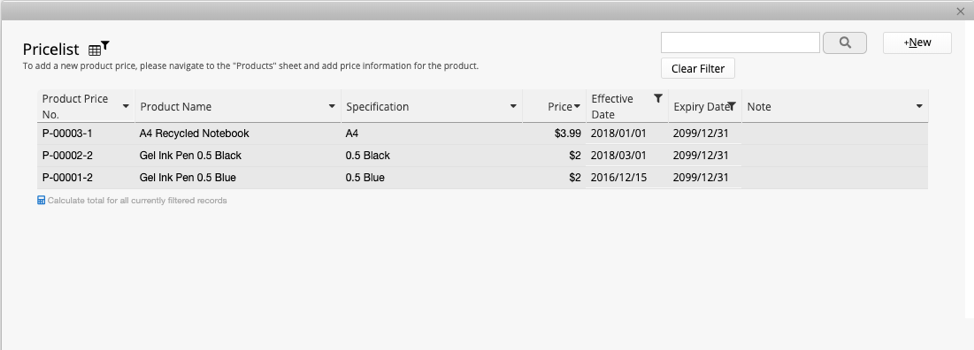
After you enter the Price, confirm the price's effective period (Effective Date and Expiry Date).
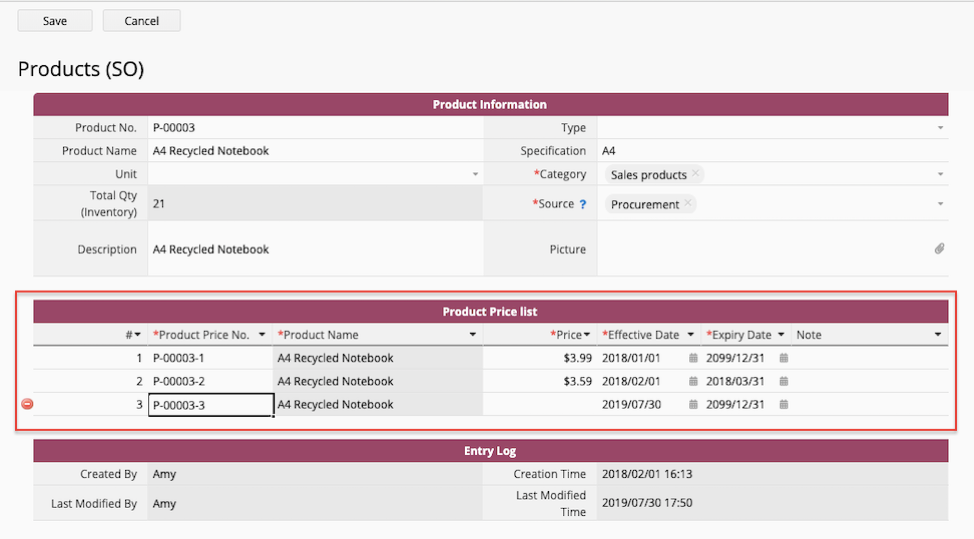
When selecting the product on the "Sales Order", what's actually selected is one of the prices of the product. The default filter shows the pricing that's valid on the date of the order. (After selecting the "Product Sales No.", the "Product Name", "Price", and "Source Product No." are automatically loaded.)
It is used to record multiple prices for a product. The ordered items selected in the "Sales Order" are selected from this sheet.
The design concept is based on the idea that the price of the product may fluctuate within a range, such as the general price or the promotional price. With Subtable management, you can clearly see all the price records of the products and maintain pricing accuracy in the "Sales Order".
This sheet is enerated from the "Product Price List" Subtable of the "Products (SO)" sheet. Currently, all fields are Read Only so that values cannot be modified. To add or modify product pricing data, please do so within the Subtable of the "Products (SO)" sheet.

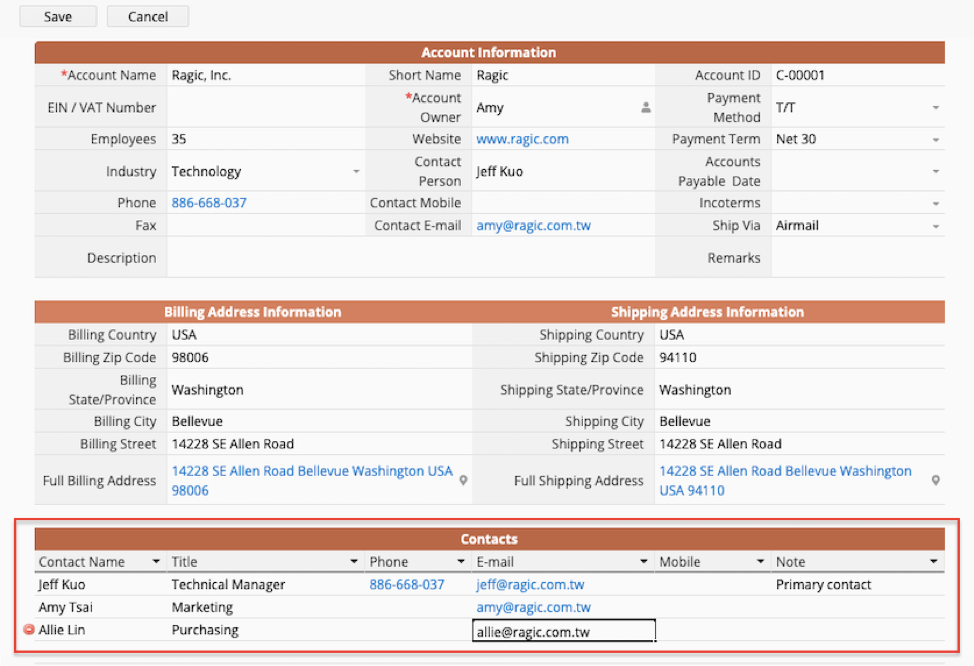
The "Account" sheet is for recording complete information about your customers. Subsequently, when a new "Sales Order" record is added, the Customer ID will be selected directly from the data in this sheet.
Account ID is a system generated serial number that starts with "C-". The fields "Account Name" and "EIN / VAT Number" must be unique and are Unique Value in this sheet.
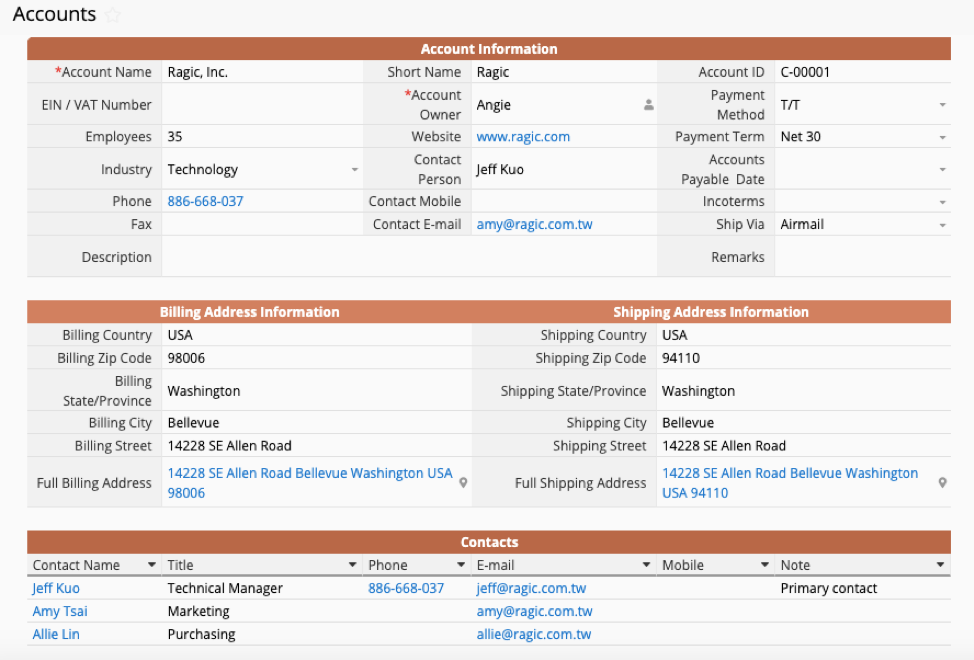
In addition to filling in the main contact person information above, there is also a Subtable of the Contacts below, allowing you to add information about multiple contacts.
The "Sales Order" record can be created by converting from a "Quotes" sheet in the Customer Relationship Management template, or by manually creating an order directly on the "Sales Order" sheet.
When sales order data is manually created, the Sales Order # is an auto-generate field that generates serial numbers based on the create date.
The Date, Order Category, and Status are based on the defaults defined by the design, and can be manually modified if necessary.
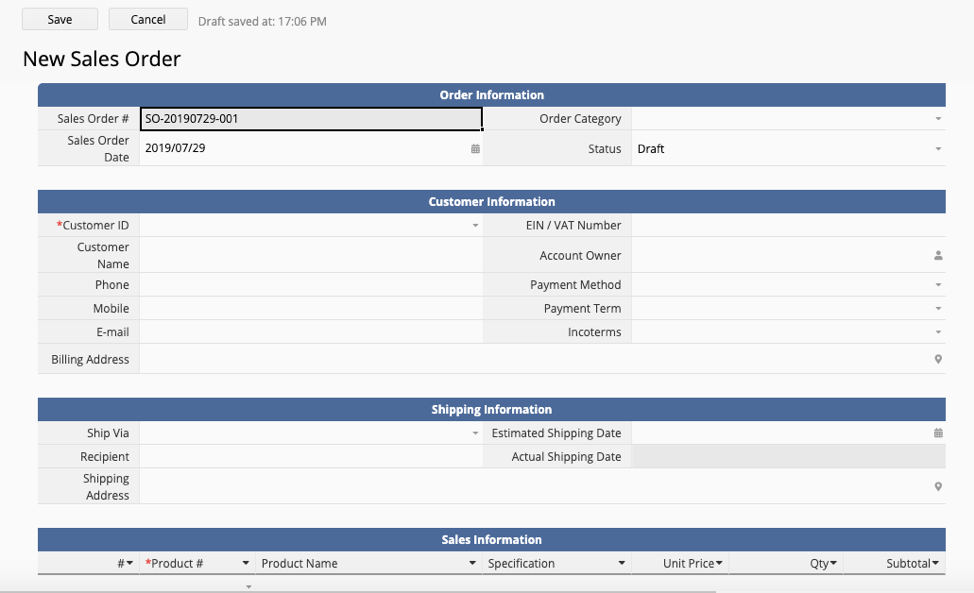
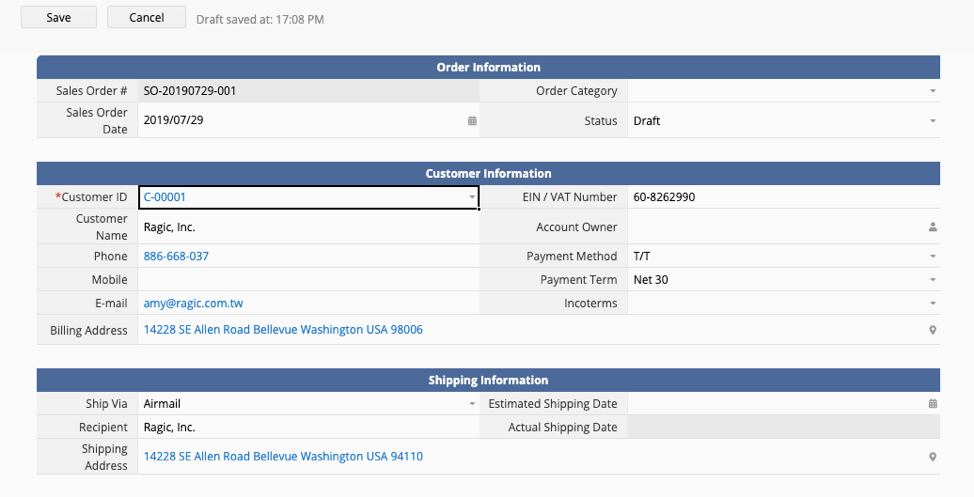
Fields related to customer information are linked to the "Accounts" sheet. Thus, after selecting the Customer ID, the Customer Name, EIN / VAT Number, Phone, etc will be brought in automatically.
If the customer is new and the customer's information has not been created in the database, you can click +New in the top right of the selection menu and the system will take you to the "Accounts" sheet to add customer information. After saving, you will return to the "Sales Order" you were just editing. The fields relevant to customer information will also be automatically populated.

Sales Information is designed with a Subtable. You can add multiple Sales Information records in it. Don’t worry about adding more than three records. Once you do, the system will add rows to the Subtable.
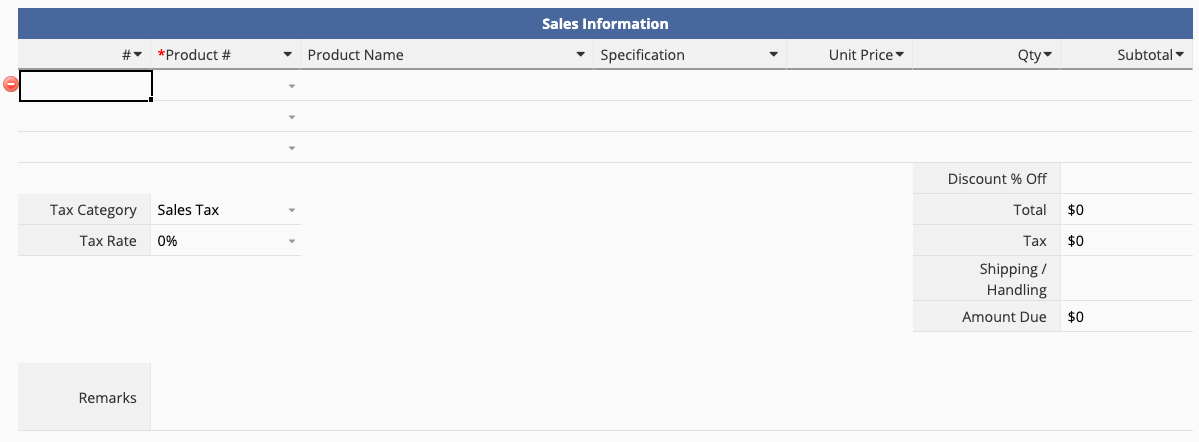
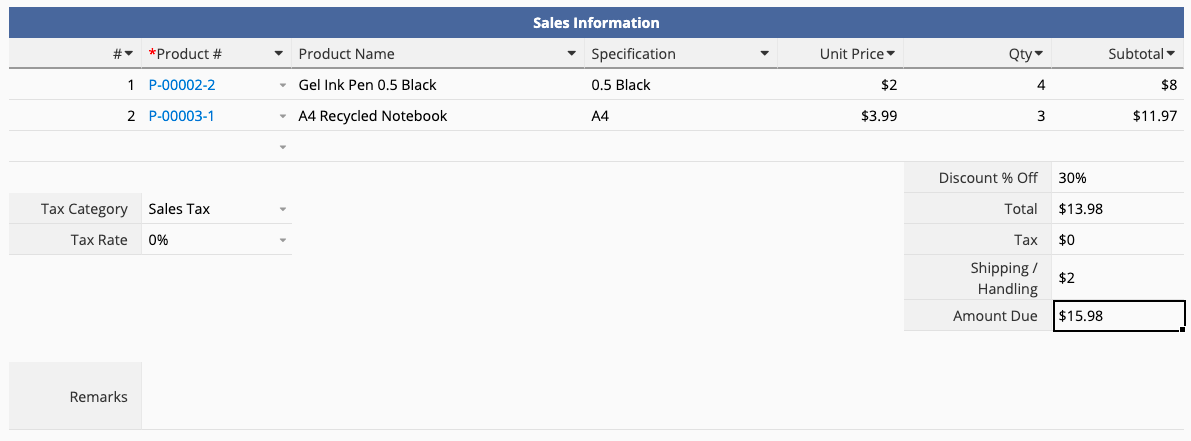
Here, the Product Sales No. is linked to our "Pricelist". The Product # can be selected here and the "Pricelist" will show according to the Sales Order Date to help you filter the options and select the suitable, effective price.
After selecting the Product #, the Product Name, Unit Price, and Source Product Number (hidden) are automatically loaded. At this time, simply enter the Qty ordered and the system will automatically calculate the Subtotal!
The Total is the sum of the Subtotal in the Sales Information subtable; Tax is Total * Tax Rate. Tax Rate is currently preset to 0%. This rate can be adjusted according to your needs.
Amount Due is (Total + Tax) * (1-Discount %) + Shipping/Handling, and is automatically calculated according to the values of the fields above.
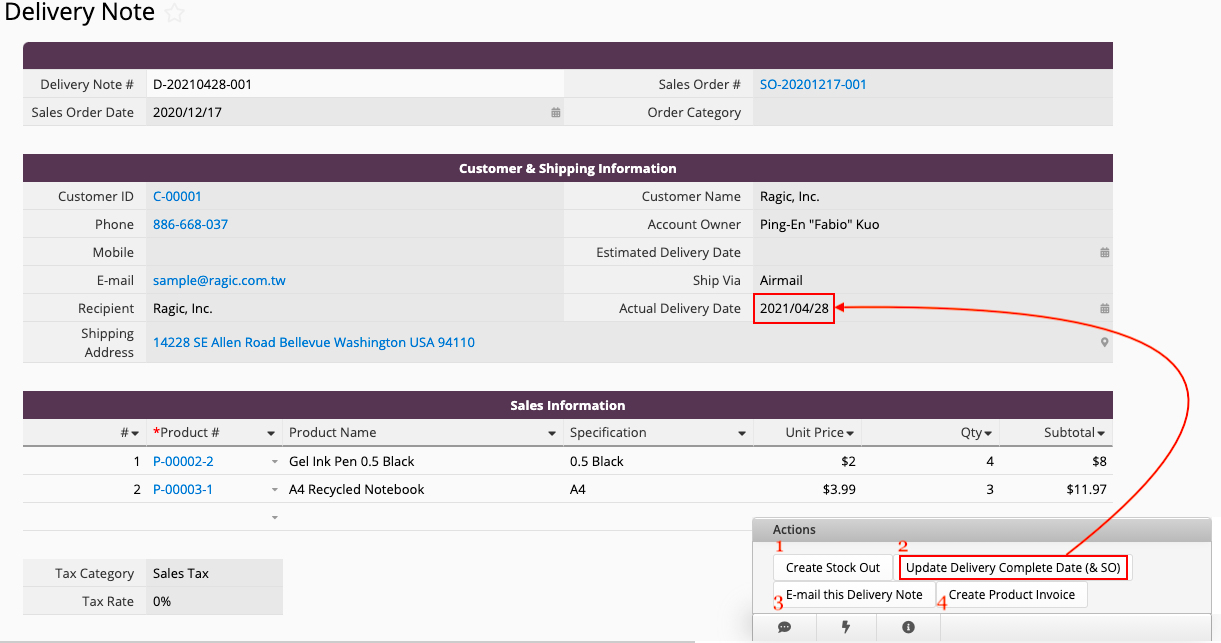
Create a "Delivery Note" by converting from a "Sales Order" record.
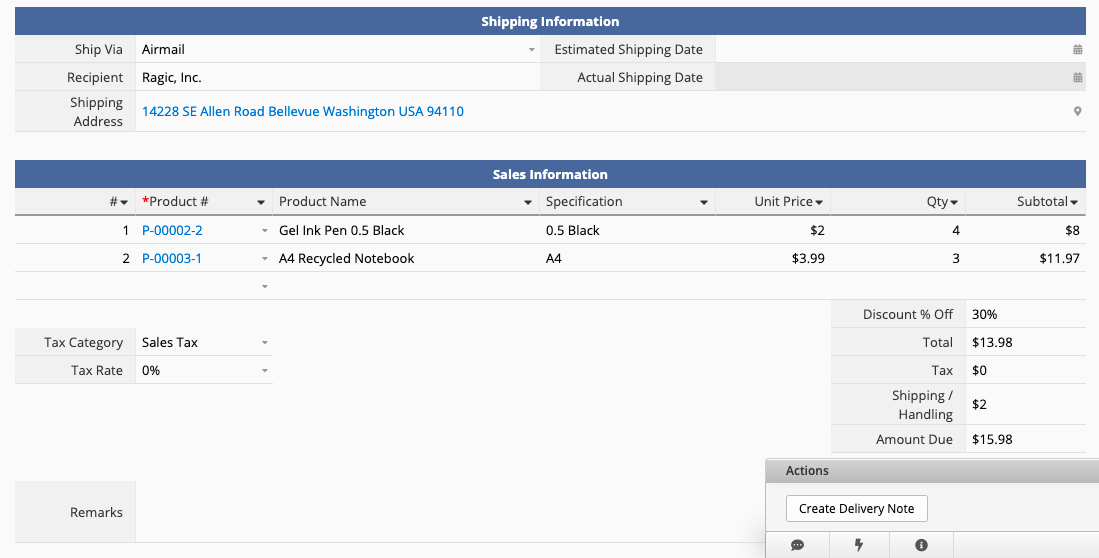
After pressing the Create Delivery Note button, the system will automatically add a record to the "Delivery Note":
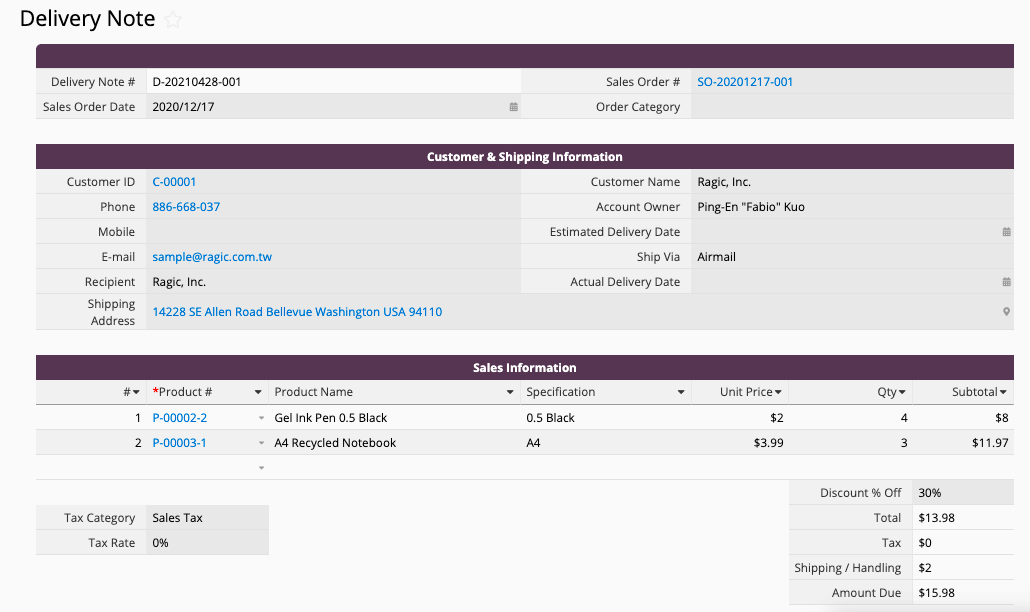
After confirming that the contents of the shipment are correct, click the Action Buttons according to the following steps:
1. Create "Stock Out" (the Inventory Management template must be installed for this to work)
2. Update Delivery Complete Date (& SO), this will update the Actual Delivery Date on the related "Delivery Note" and source "Sales Order" records to today's date.
3. E-mail this Delivery Note, will send a delivery notification to the customer by email (use as needed; to customize the content of the e-mail, see this article for instructions.)
4. Create Product Invoice (the "Accounting" template must be installed for this to work)
 Thank you for your valuable feedback!